


Custom Parcels - How to distribute your own libraries
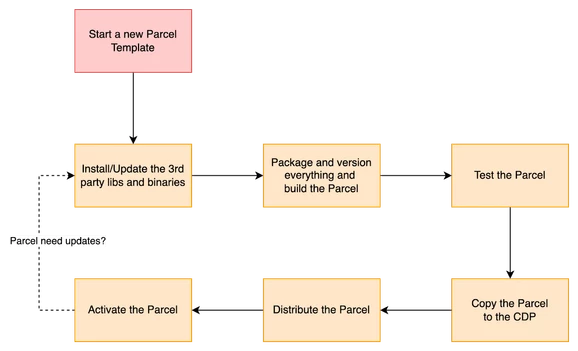
STEP 2: Start a new Parcel
- Create a directory for your our Parcel:
mkdir -p /usr/local/parcels/MY_CONDA-3.6.10-0 - Notice that the version could be any version you want, as long as you follow the PACKAGENAME-VERSION format.
- Go to the Parcel directory:
cd /usr/local/parcels/MY_CONDA-3.6.10-0
STEP 3: Download and install the Miniconda
- Download miniconda from https://docs.conda.io/en/latest/miniconda.html
- Install miniconda in /usr/local/parcels/MY_CONDA-3.6.10-0/miniconda3 and don't forget to read and agree with the licensing terms:
bash /path/to/Miniconda3-latest-Linux-x86_64.sh - Go to the Parcel directory:
cd /usr/local/parcels/MY_CONDA-3.6.10-0 - Install the Python 3.6.10 version:
miniconda3/bin/conda install python=3.6.10 - Check Python version:
miniconda3/bin/python --version - Install pandas:
miniconda3/bin/conda install pandas - At this point, you can install other required Python libraries.
STEP 4: Setup your Parcel
- Go to the Parcel directory:
cd /usr/local/parcels/MY_CONDA-3.6.10-0 - Create a meta-directory:
mkdir meta - Create a meta/parcel.json file:
{
  "schema_version": 1,
  "name": "MY_CONDA",
  "version": "3.6.10-0",
  "setActiveSymlink": true,
  "depends": "",
  "replaces": "",
  "conflicts": "",
  "provides": [ ],
  "scripts": {
    "defines": "my_conda_env.sh"
  },
  "packages": [ ],
  "components": [
    { "name"       : "miniconda3",
      "version"    : "4.10.3",
      "pkg_version": "4.10.3",
      "pkg_release": "4.10.3"
    },
    { "name"       : "python",
      "version"    : "3.6.10",
      "pkg_version": "3.6.10",
      "pkg_release": "3.6.10"
    }
  ],
  "users": {
    "spark": {
      "longname"    : "Spark",
      "home"        : "/var/lib/spark",
      "shell"       : "/usr/sbin/nologin",
      "extra_groups": [ ]
    }
  },
  "groups": [ ]
} - Create an empty meta/my_conda_env.sh file:
#!/bin/sh
# EOF - Validate the parcel.json file:
java -jar /path/to/validator.jar -p /usr/local/parcels/MY_CONDA-3.6.10-0/meta/parcel.json - Validate the parcel's directory:
java -jar /path/to/validator.jar -d /usr/local/parcels/MY_CONDA-3.6.10-0/ - Move to the parent directory:
cd.. - And, package the parcel as TAR.GZ targeting to a RedHat EL 7:
tar zcf MY_CONDA-3.6.10-0-el7.parcel MY_CONDA-3.6.10-0/ --owner=root --group=root - Validate the new generated parcel:
java -jar /path/to/validator.jar -f /usr/local/parcels/MY_CONDA-3.6.10-0-el7.parcel - Sign the parcel:
sha1sum < MY_CONDA-3.6.10-0-el7.parcel | cut -d ' ' -f 1 > MY_CONDA-3.6.10-0-el7.parcel.sha
STEP 5: Install and distribute the Parcel
- Copy the parcel and the sha files to the /opt/cloudera/parcel-repo directory in the Cloudera Manager node.
- Change the permissions:
sudo chown cloudera-scm: /opt/cloudera/parcel-repo/MY_CONDA-3.6.10-0-el7.parcel* - Go to Cloudera Manager > Parcels, and click Check for New Parcels
- After the parcels are detected, click Distribute
- Click Activate to activate the Parcel
- Make sure everything is working in all nodes:
/opt/cloudera/parcels/MY_CONDA/miniconda3/bin/python --version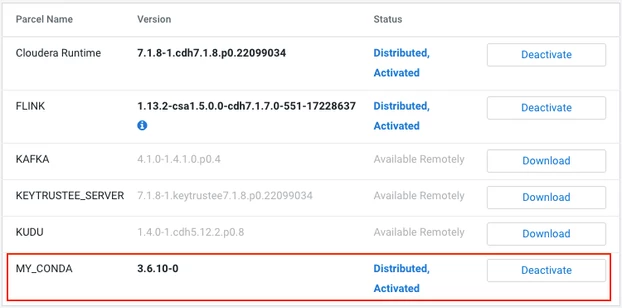
Summary
While this article is not intended to be a definitive guide on this subject, as each company has their own requirements, consider this a simple introduction to how Parcels work in the CDP environment and how to leverage it to get more productivity in Cloudera environments.
Parcel is a binary distribution format that allows us to easily install, update or even remove a set of files in a simple, uniform, versioned, consistent, and distributed way in a Cloudera environment.
We can leverage this to distribute any set of files, such as Java or Python dependencies, different versions of Python, Hive UDFs, HBase coprocessors, scripts, third-party tools, etc. In addition, it is also possible to integrate with existing components, such as adding a library to the classpath of Hive, HBase, Spark, etc.
To learn more about Parcels, including advanced usage and integration with existing Cloudera's components, see the following links:
- Overview of Parcels
- Running Spark Python applications
- Installing Anaconda in Cloudera CDH
- Conda Project
- Cloudera Manager Extensions
- Parcels: What and Why?
- Why you should use Parcels
- The Parcel Format
- Building a Parcel
- The Parcel Repository Format