


How to Integrate CDE with COD and Reading & Writing to Phoenix Tables using Data Engineering Service by leveraging PySpark on CDP Platform.
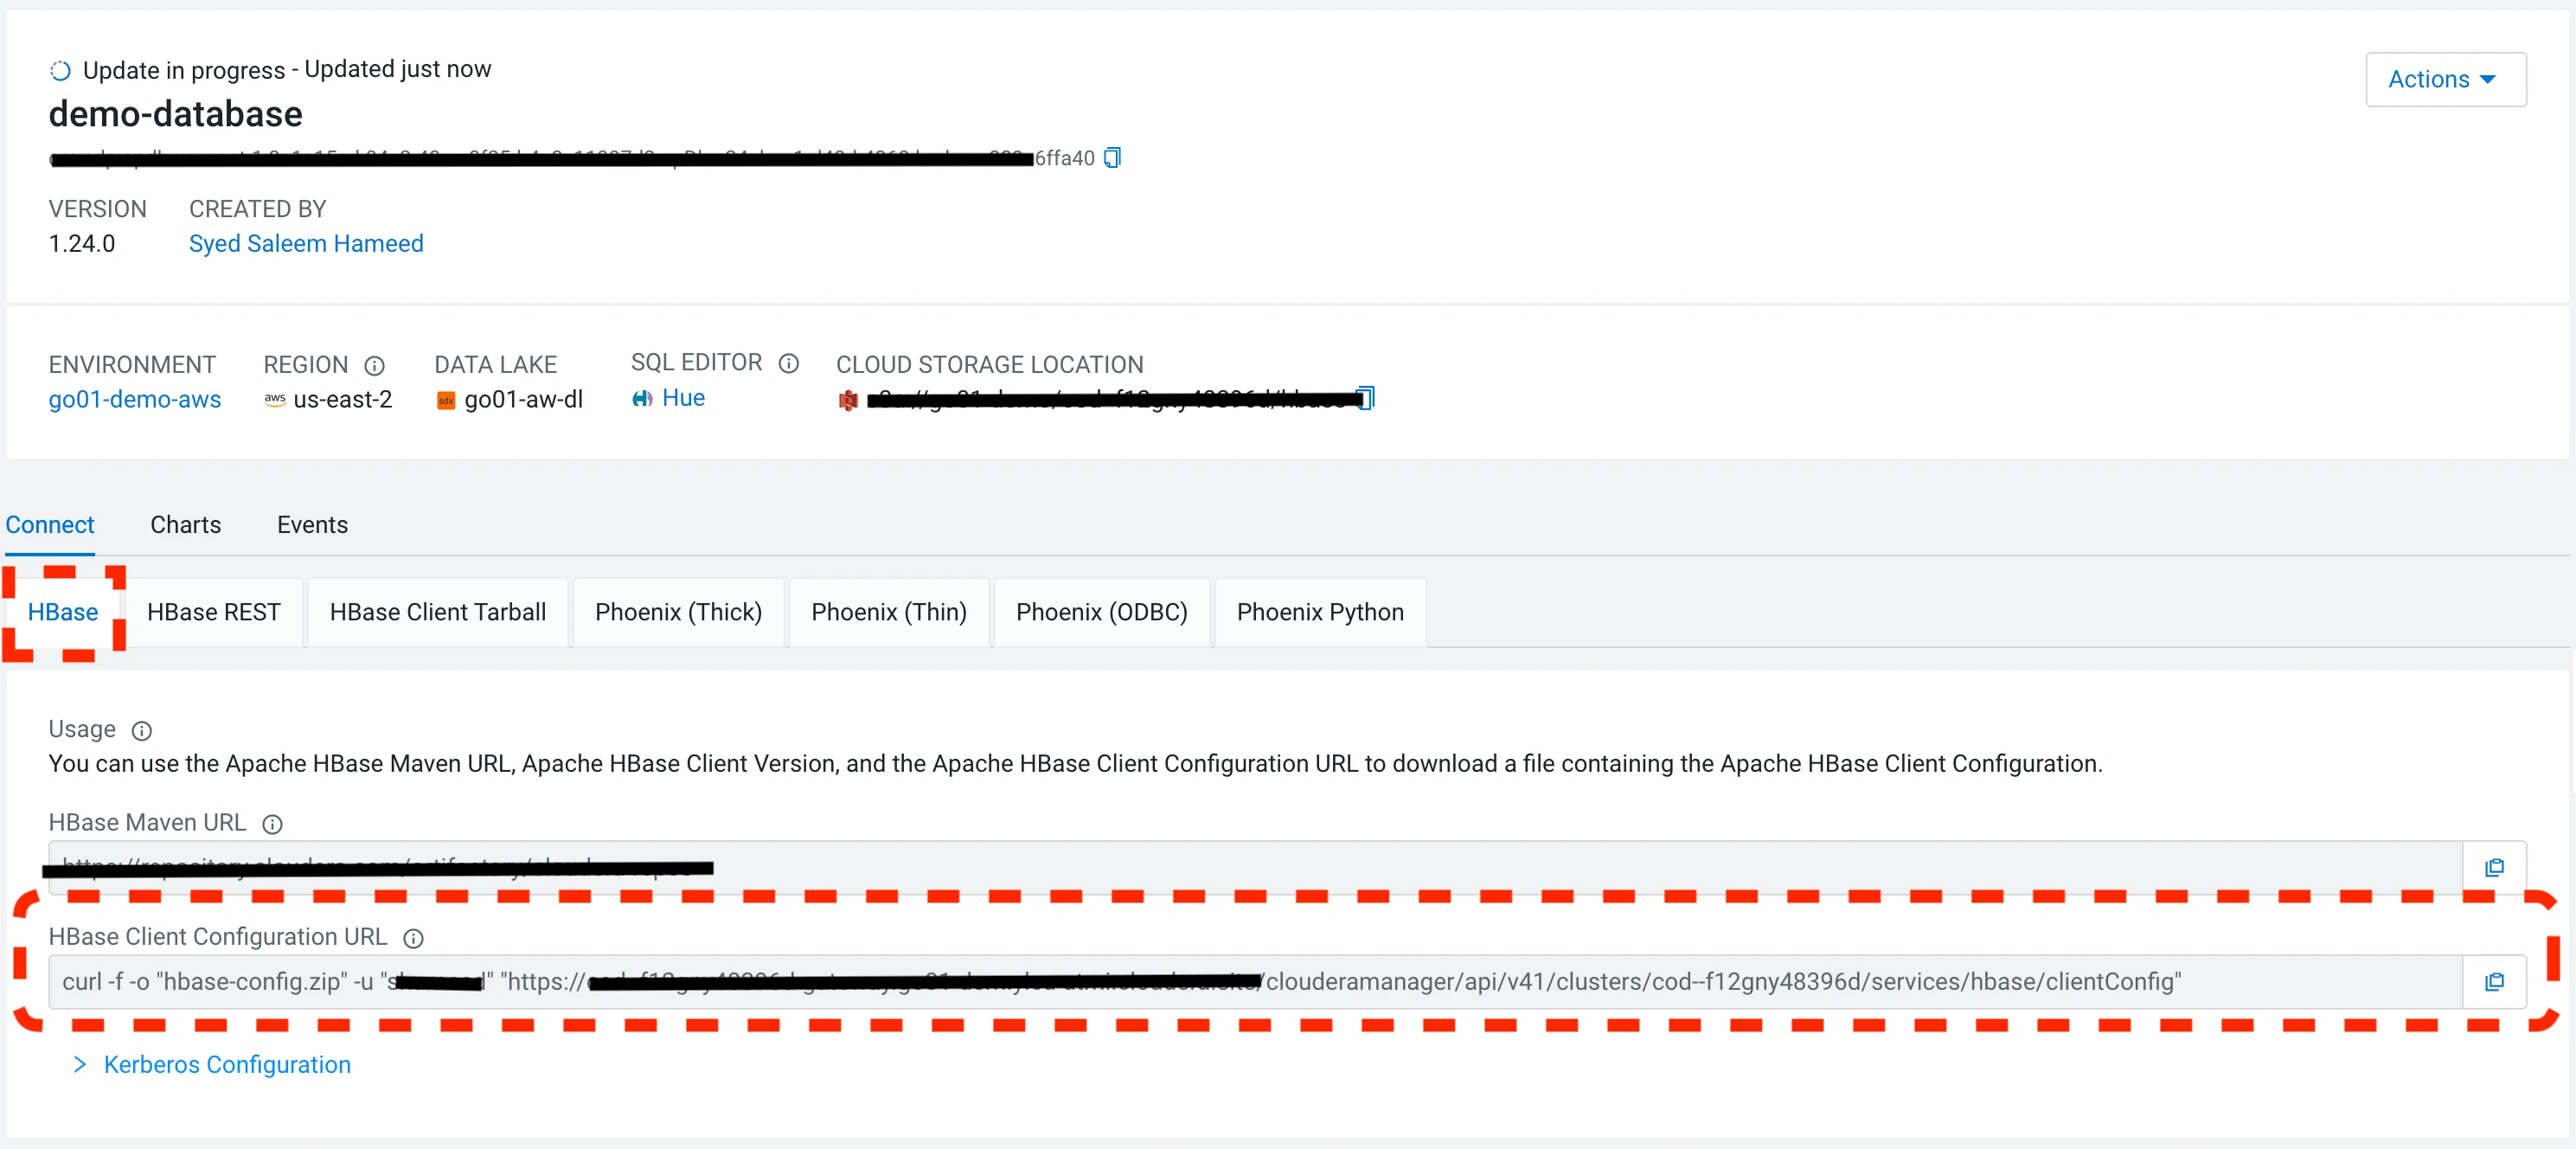
curl -f -o "hbase-config.zip" -u "workload-username" "xxxxxxxxxxxxx/clouderamanager/api/v41/clusters/cod--f12gny48396d/services/hbase/clientConfig"
- Make sure to provide the "workload-username" & "workload-password" for above curl call. Follow the document to obtain "workload-username" & "workload-password" credentials.
- Extract the downloaded zip file to obtain the hbase-site.xml file.
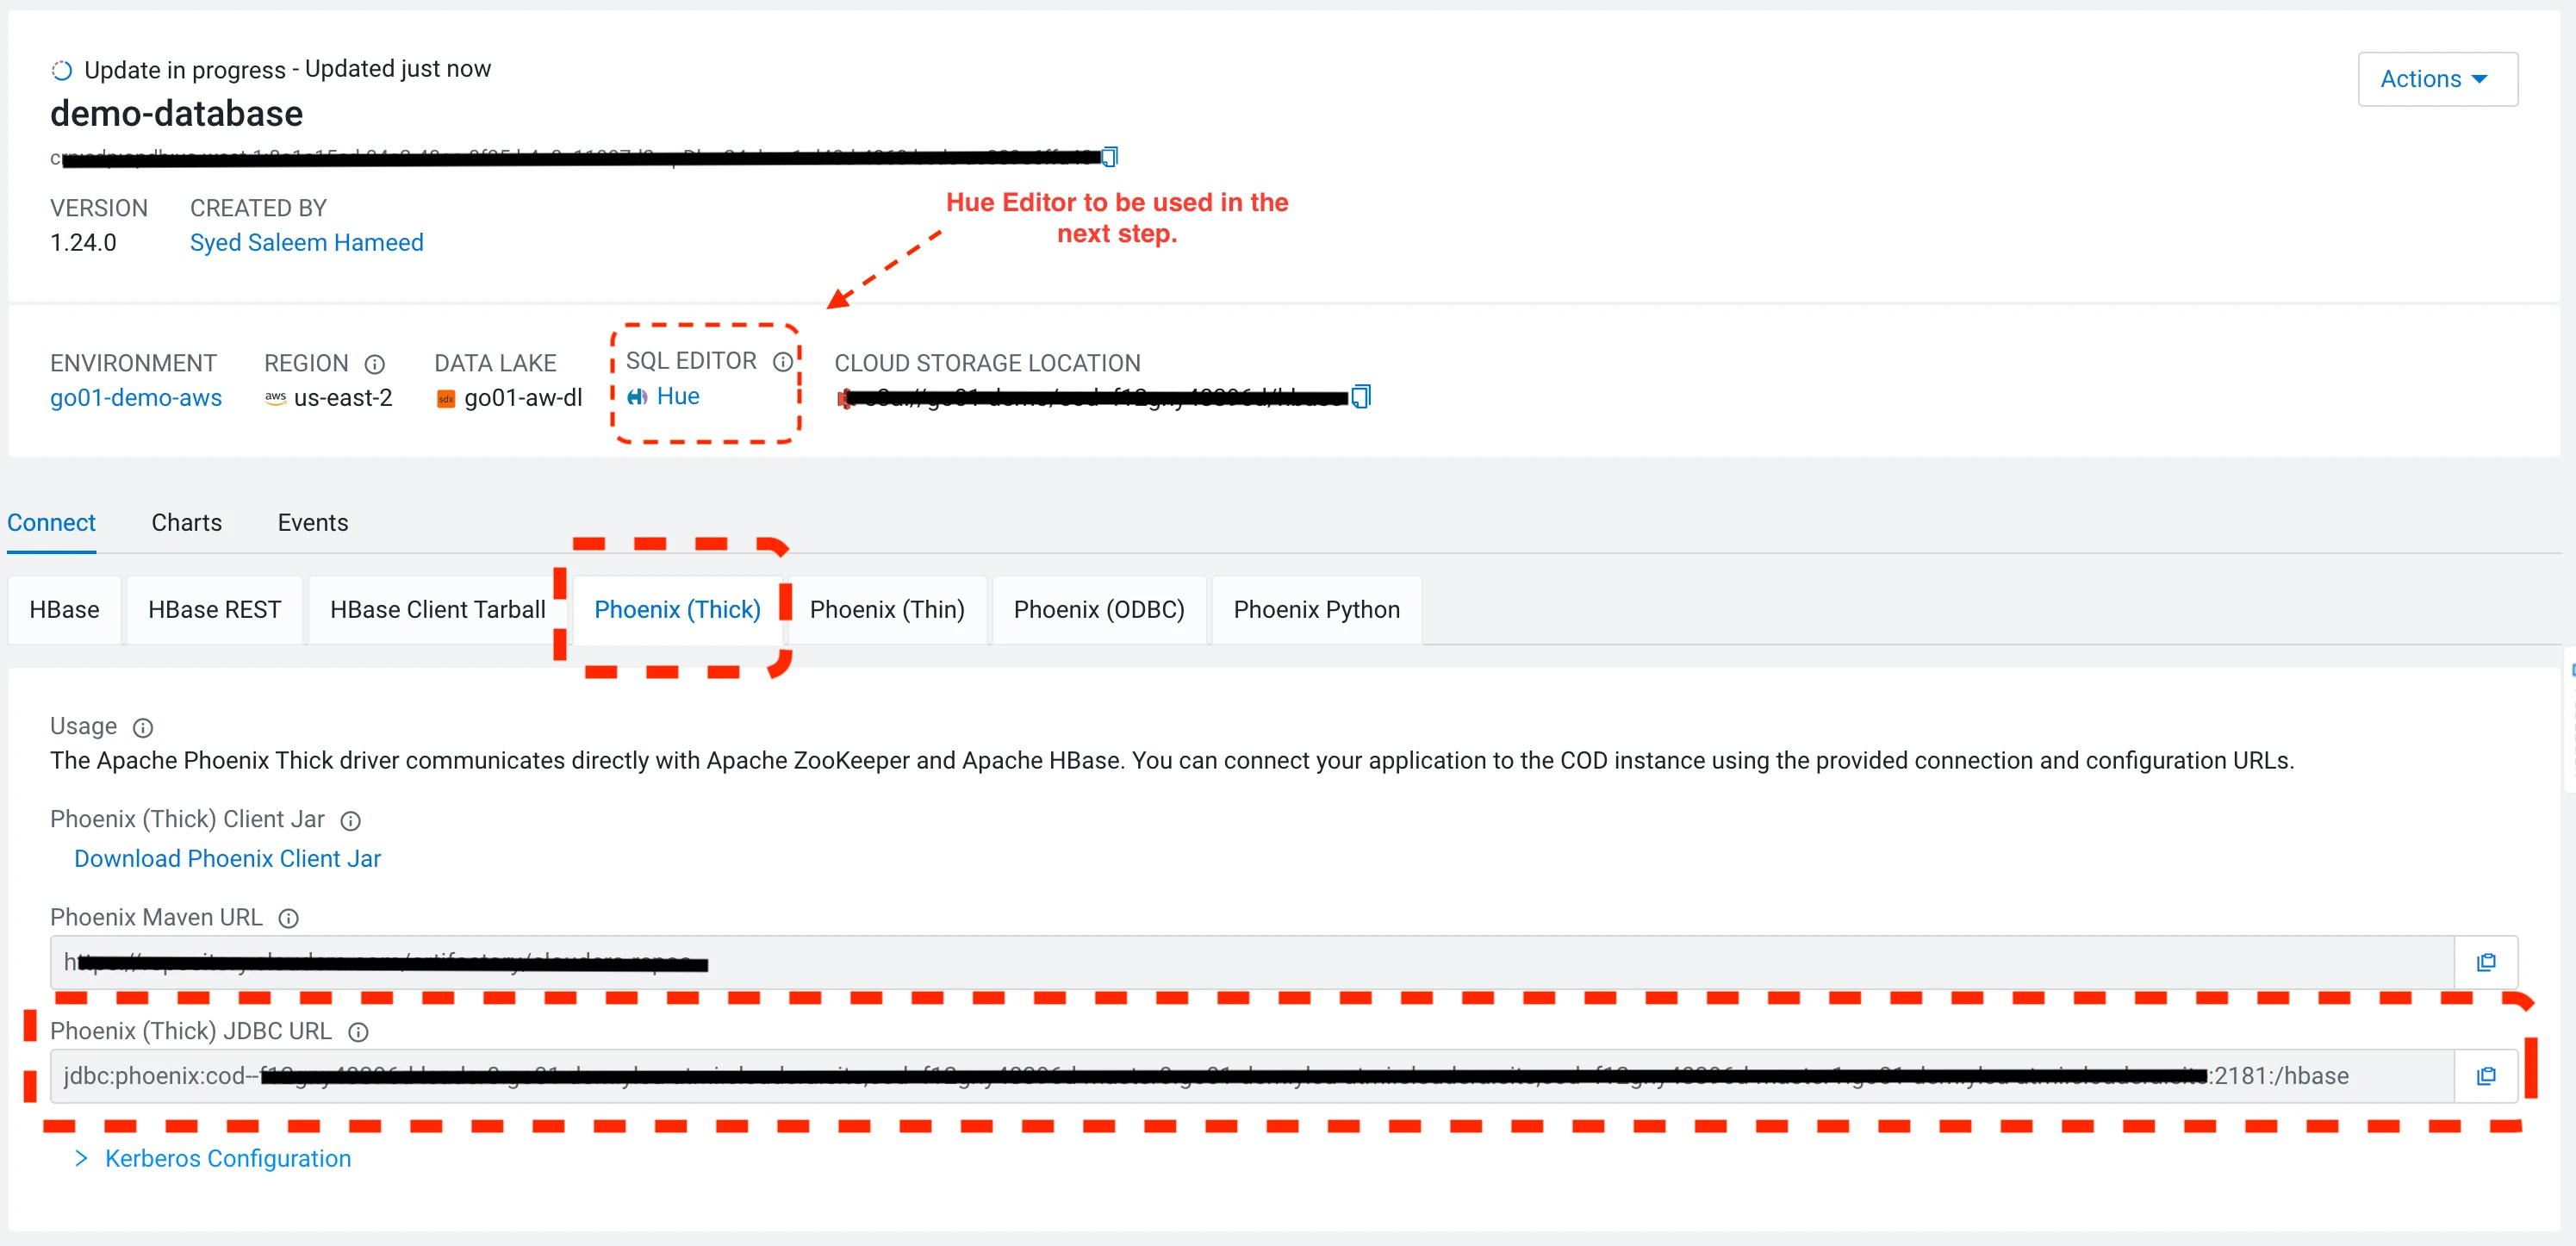
- Note down the Phoenix JDBC URL from the Phoenix (Thick) tab.
Step-2:
Preparing the Operational Database Table.
Cloudera provides flexibility with multiple options for the Data Practitioners to use Command Line (CLI) or use the GUI web console. Describing both the options for users' flexibility:
- Option 1: Preparing Operational Database using CLI:
- Log in to the Gateway Node of Cluster.
- Go to the Environment of the Operational Database Cluster > Nodes.
- Copy the IP address of the Gateway node.
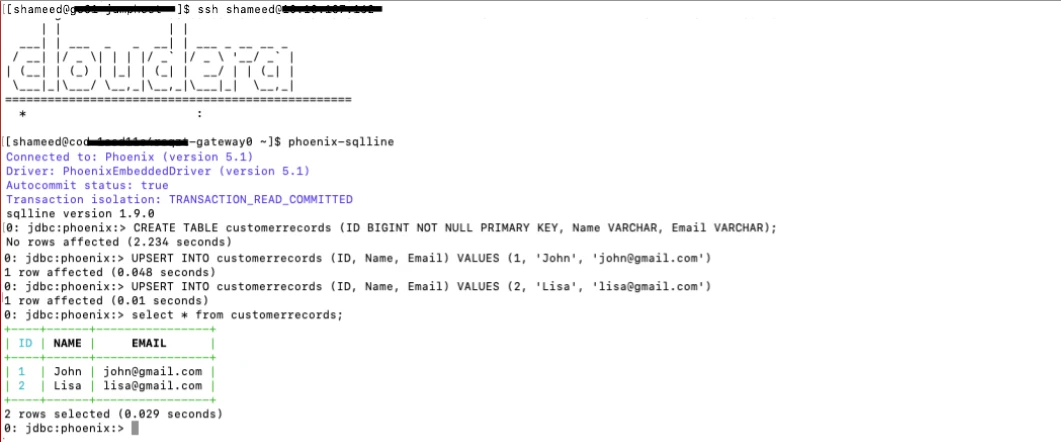
- Run the below commands: ($ phoenix-sqlline is used to login to phoenix SQL )
- Log in to the Gateway Node of Cluster.
$ phoenix-sqlline
$ CREATE TABLE customerrecords (ID BIGINT NOT NULL PRIMARY KEY, Name VARCHAR, Email VARCHAR);
$ UPSERT INTO customerrecords (ID, Name, Email) VALUES (1, John’, ’john@gmail.com’);
$ UPSERT INTO customerrecords (ID, Name, Email) VALUES (2, Lisa’, ’lisa@gmail.com’);
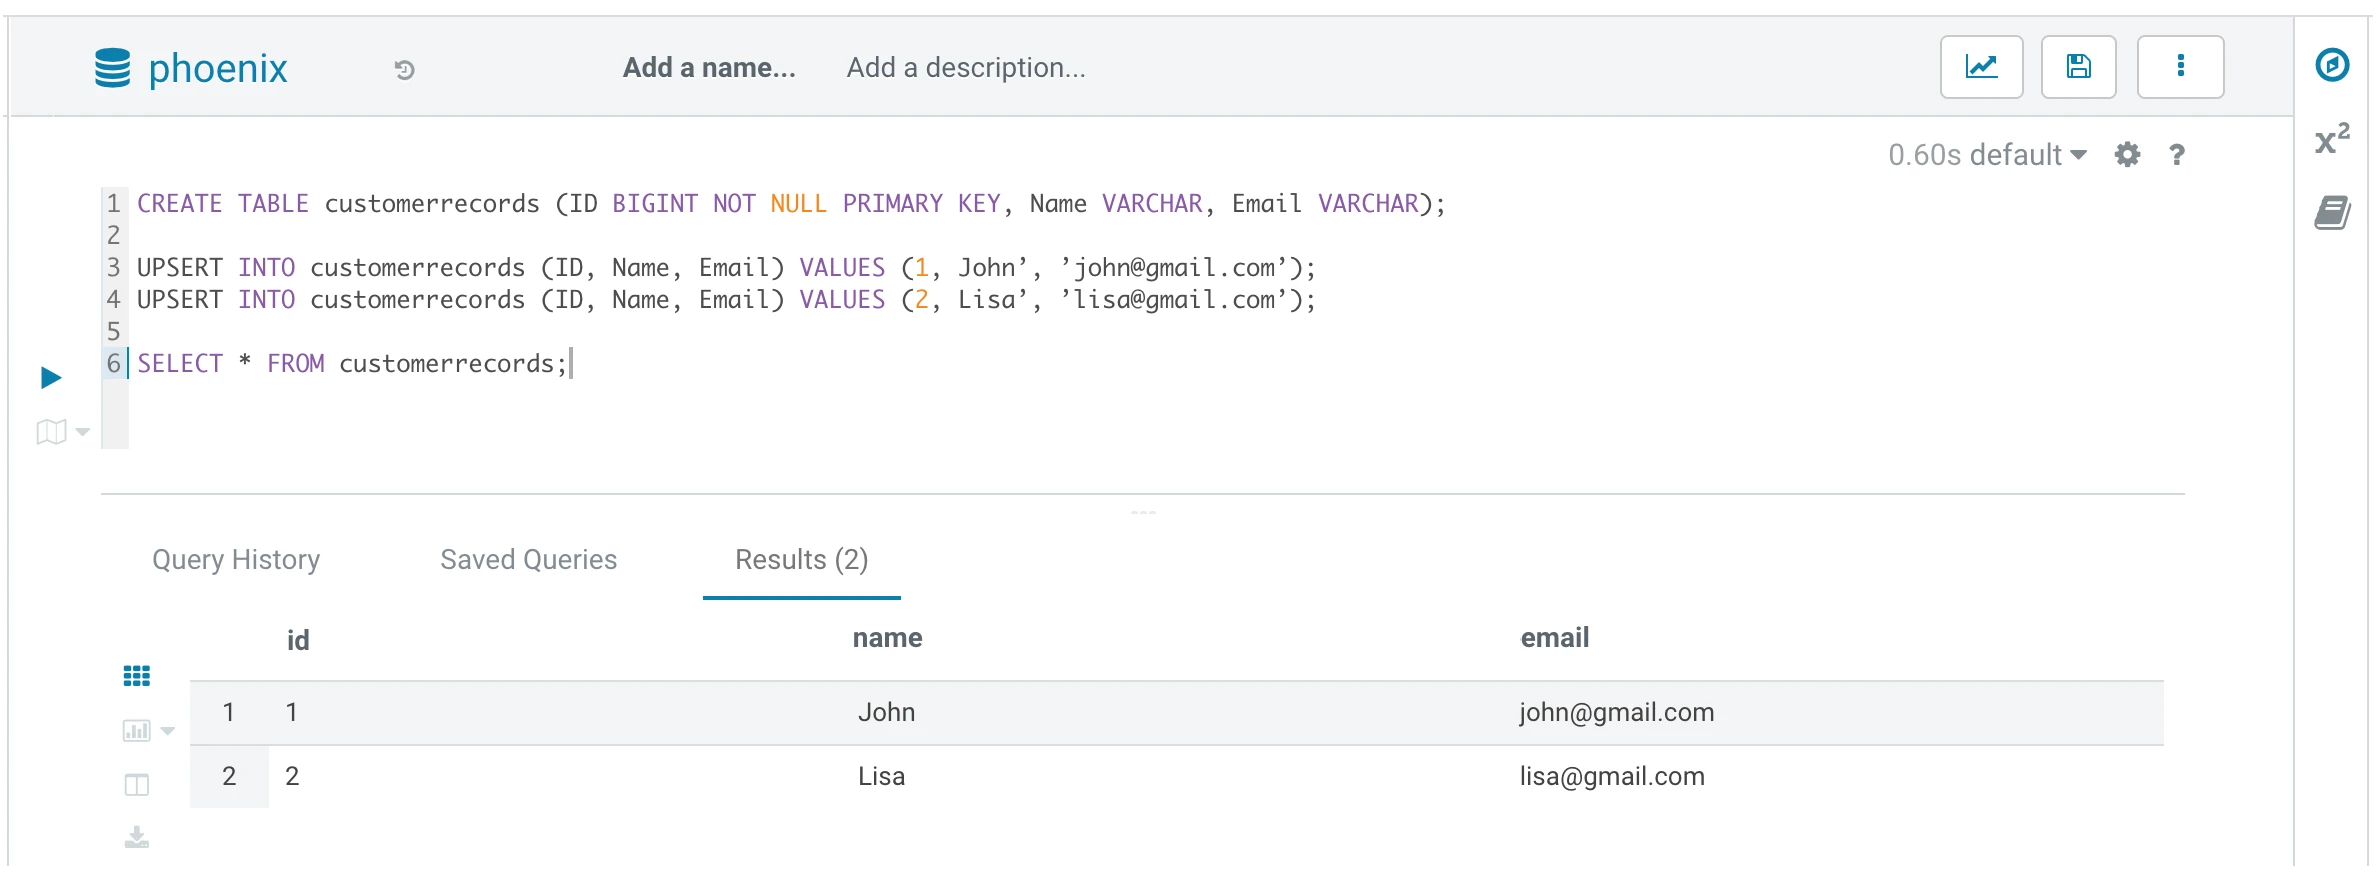
- Option 2: Preparing Operational Database using SQL on Hue UI:
- Go to the Operational Database (Example: Demo-database) control plane UI and click on Hue.
- Run the below commands:
$ CREATE TABLE customerrecords (ID BIGINT NOT NULL PRIMARY KEY, Name VARCHAR, Email VARCHAR);
$ UPSERT INTO customerrecords (ID, Name, Email) VALUES (1, John’, ’john@gmail.com’);
$ UPSERT INTO customerrecords (ID, Name, Email) VALUES (2, Lisa’, ’lisa@gmail.com’);
Step-3
(Create & Run CDE Job):
In this final step, we will create a Data Engineering Job leveraging Cloudera Data Engineering Experience GUI with a few simple clicks, to Write & Read the Phoenix Table we prepared in Step 2.
- Assuming the Data Engineering Virtual Cluster is ready as described in the Pre-Req steps, Kindly go to the Go to Home Page of the Cloudera Data Engineering Experience and Create a New Job.
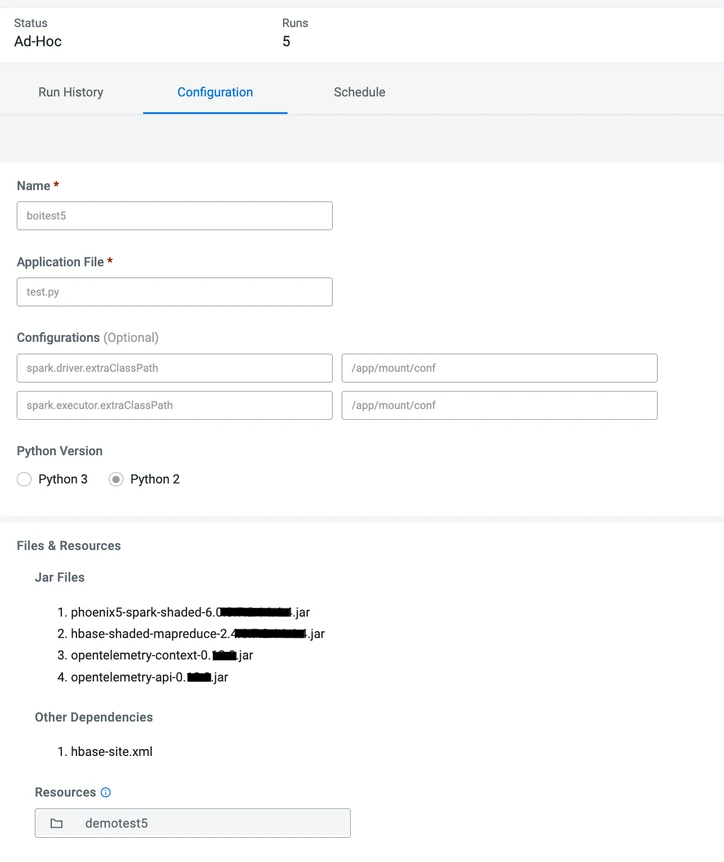
- Below are the steps to submit the Python Job Script and Dependencies in the job:
- Name: Job Name (Example: boitest5)
- Application File: PySpark script to write & read the Phoenix Table (Sample Script Pasted at the end).
- Configurations: (The spark driver & executor will read the Hbase-site.xml file from the below path)
- spark.driver.extraClassPath = /app/mount/conf
- spark.executor.extraClassPath = /app/mount/conf
- Python Version: Python 2
- Advanced Options:
- Jar Files: Downloaded from the Gateway Node of the Operational Database Cluster (Version of the jars depends on the COD version & Jars can be obtained under /opt/cloudera/parcels/xxx/jars/xxx).
- phoenix5-spark-shaded-6.0.x.x.x.jar
- hbase-shaded-mapreduce-2.x.x.jar
- opentelemetry-context-0.x.x.jar
- opentelemetry-api-0.x.x.jar
- Other Dependencies:
- Create a folder under resources - /conf
- Place the hbase-site.xml (Downloaded in the Step-3 of Step-1)
- Create and Run Job.
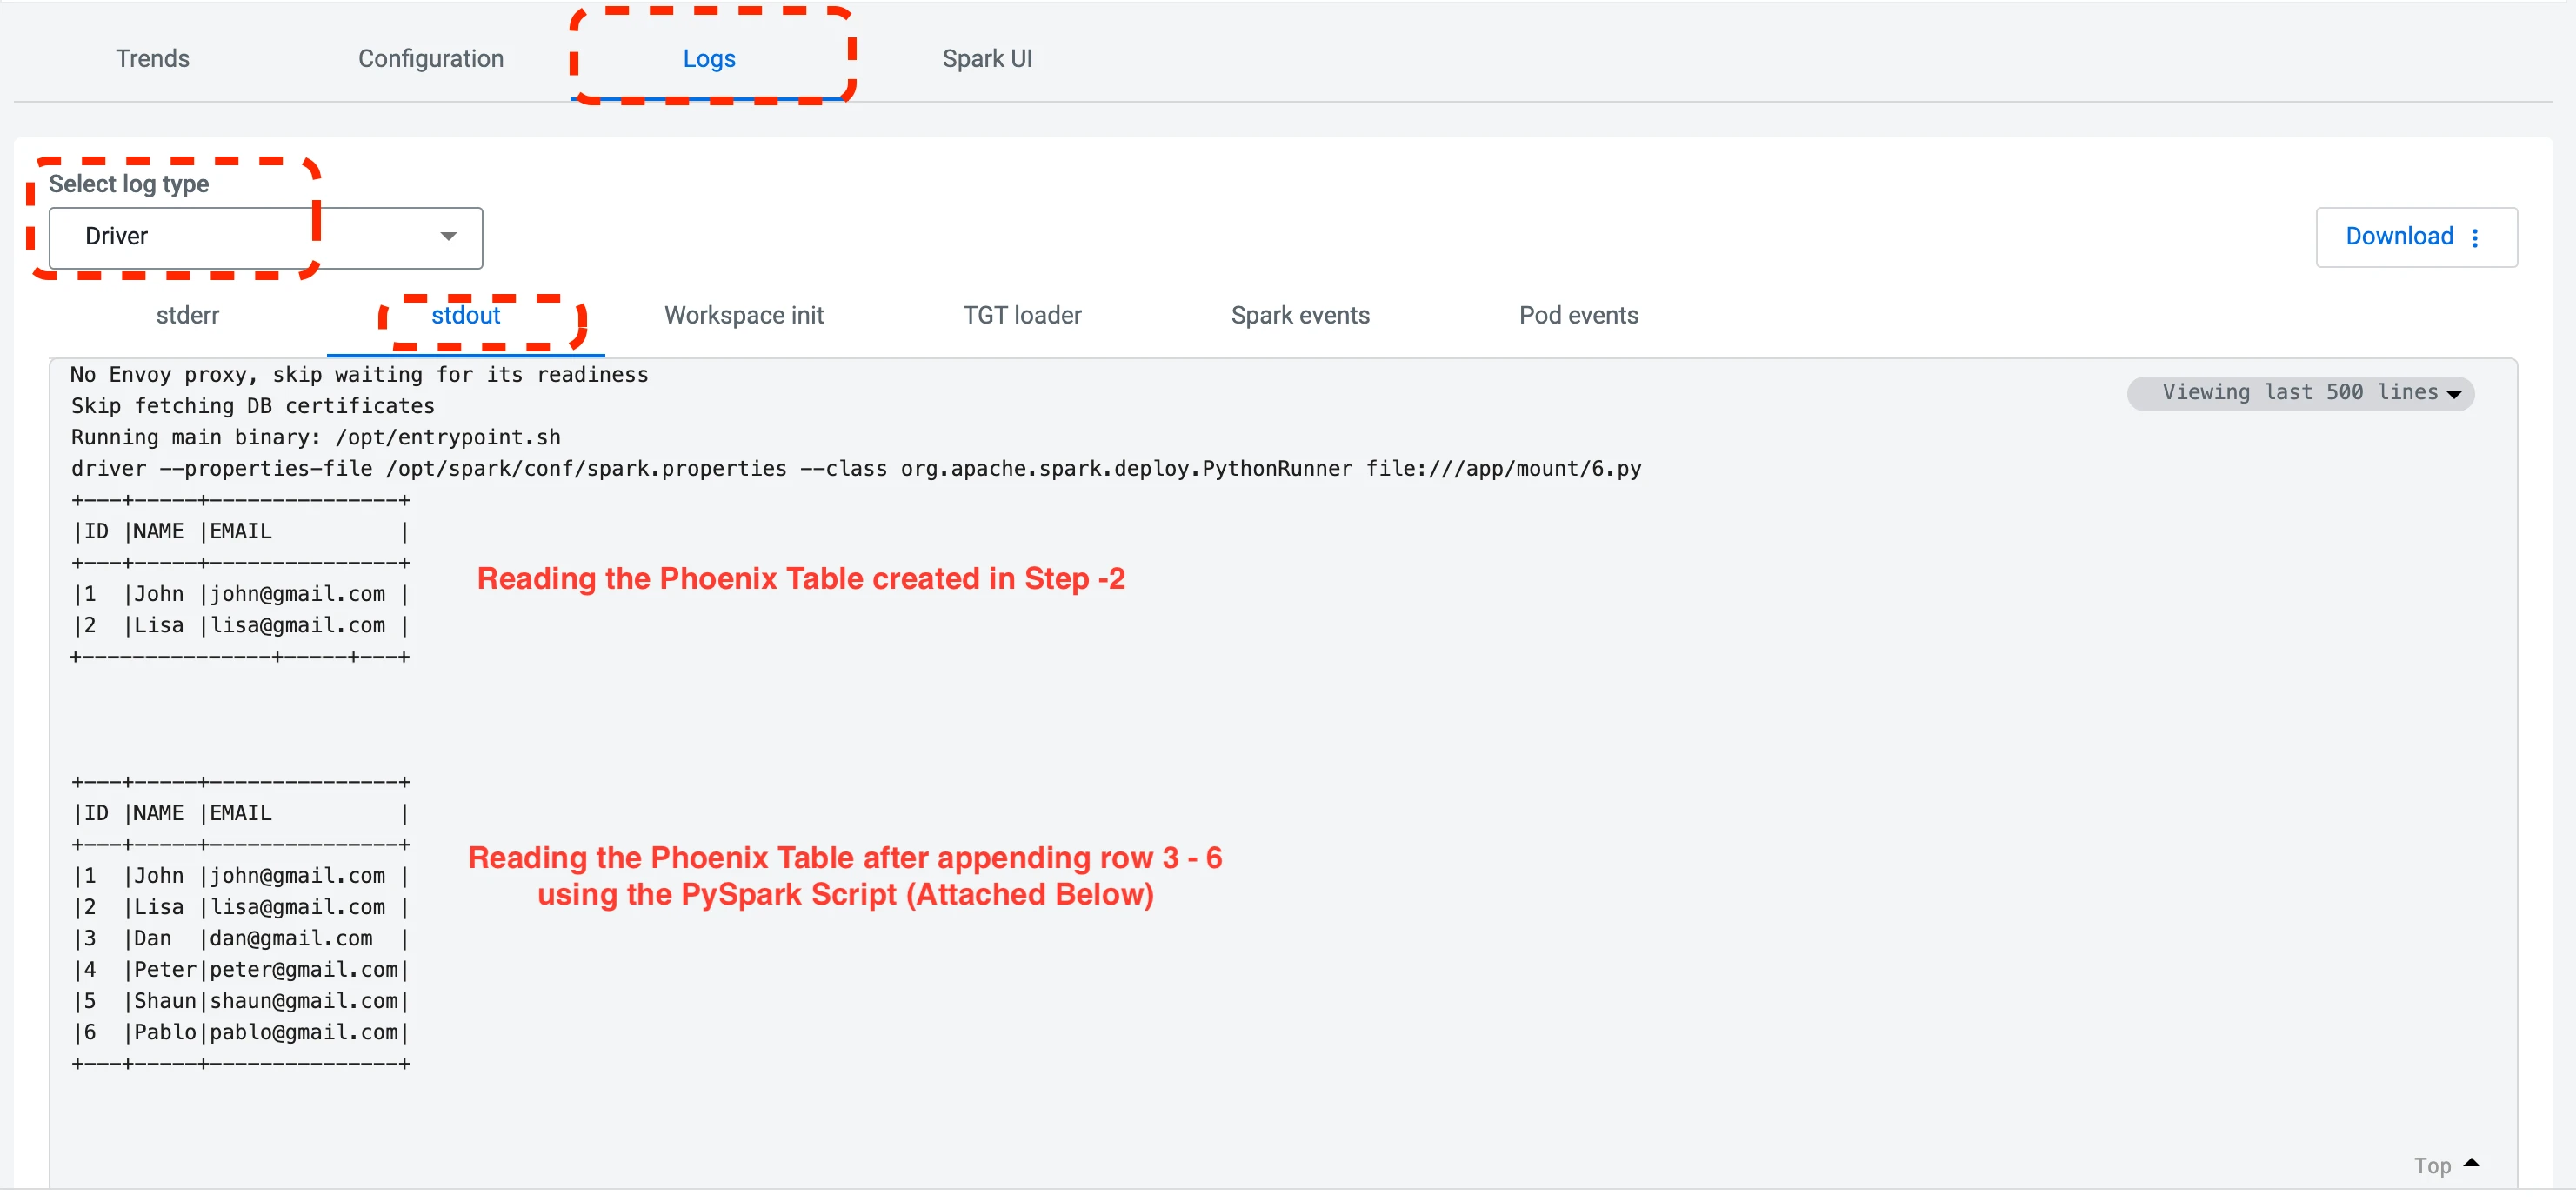
OUTPUT/Result:
- Go to CDE Virtual Cluster > Job (boitest5) > Logs > stdout
Sample Script (test.py):
from pyspark.sql import SparkSession
from pyspark.sql import SQLContext

def create_spark_session():
  """
  Create a Spark Session
  """
  spark_session = SparkSession.builder \
							  .appName("CDPSparkPhoenixTestApp") \
							  .enableHiveSupport() \
							  .getOrCreate()

  spark_session.sparkContext.setLogLevel('DEBUG')

  return spark_session

zookeeper_urls = "<Phoenix (Thick)URL copied from COD Database UI>:2181"
phoenix_tablename = "customerrecords"

spark = create_spark_session()
sqlContext = SQLContext(spark)

df = sqlContext.read \
			   .format("phoenix") \
			   .option("table", phoenix_tablename) \
			   .option("zkUrl", zookeeper_urls) \
			   .load()
df.show(truncate=False)


records = [
        (3,'Dan','dan@gmail.com'),
        (4,'Peter','peter@gmail.com'),
        (5,'Shaun','shaun@gmail.com'),
        (6,'Pablo','pablo@gmail.com')
          ]
columns = ["id", "name", "email"]

df = spark.createDataFrame(data = records, schema = columns) \

df.write \
  .format("phoenix") \
  .mode("overwrite") \
  .option("table", phoenix_tablename) \
  .option("zkUrl", zookeeper_urls) \
  .save()


df = sqlContext.read \
			   .format("phoenix") \
			   .option("table", phoenix_tablename) \
			   .option("zkUrl", zookeeper_urls) \
			   .load()
df.show(truncate=False)


spark.stop()
Thank you and feel free to reach out for any questions 🙂