Our Community is getting an upgrade! To get everything ready for the relaunch, we’ll be placing the site in read-only mode starting September 21st.
We really appreciate your understanding while we get things set up behind the scenes. Catch up on all the exciting details about the move here.
Need help or have questions? Drop us a line at [email protected]

Community Articles

Find and share helpful community-sourced technical articles.
Announcements
Share your experience with Cloudera on G2 and get a $25 Amazon Gift card.
Hi, I'm CLEO! Something exciting is coming to the Community. Stay Tuned!

avatar
Contributor

Cloudera Machine Learning provides a number of methods of connecting to other CDP services and experiences such as a Cloudera Data Warehouse. In this post, we will connect using Python and the Impyla library, as well as using the embedded Cloudera Data Visualization.

Using Impyla 

  1. Within Cloudera Machine Learning, create a new project and set the language to Python 3.6. The connection details are available from the Data Warehouse console by copying the JDBC connection details which will look like.
    jdbc:impala://coordinator-aws-2-impala-prod.env-j2ln9x.dw.ylcu-atmi.cloudera.site:443/default;AuthMech=3;transportMode=http;httpPath=cliservice;ssl=1;UID=<workload username>;PWD=<workload password>
  2. Use the following Python code to install Impyla and configure a connection:
    !pip3 install impyla==0.16a3
    
    USERNAME='<workload username>'
    IMPALA_HOST='coordinator-aws-2-impala-prod.env-j2ln9x.dw.ylcu-atmi.cloudera.site'
    IMPALA_PORT='443'
    
    from impala.dbapi import connect
    conn = connect(host=IMPALA_HOST,
                   port=IMPALA_PORT,
                   auth_mechanism='LDAP',
                   user=USERNAME,
                   password=os.environ['PASS'],
                   use_http_transport=True,
                   http_path='/cliservice',
                   use_ssl=True)
    cursor = conn.cursor()
    cursor.execute('show databases')
    for row in cursor:
    	print(row)        

Note: The PASS variable is an Environment variable set in the Project settings under the Advanced tab. This does not protect your password but will mitigate the risk of it being copied into a version control service.

Using Visual Applications

  1. Create a Cloudera Data Visualization App by following the instructions at Accessing Data Visualization in CML.
  2. Log out as your default user and log back into Cloudera Data Visualization using the local admin user account.
    Note: You can raise a support request if you don't have access to this.
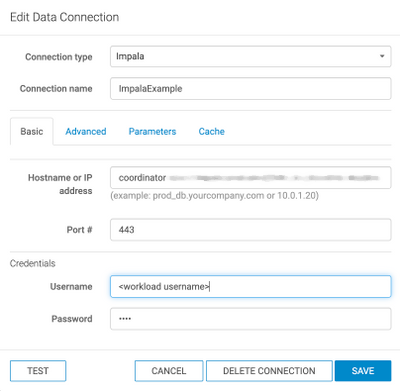
  3. Add a new connection under Basic settings using the following parameters.
    • Connection Name: Name your Connection

    • Hostname or IP Address:  Use the hostname from the JDBC string

    • Port #: Use the SSL port of 443

    • Username: CDP Workload Username

    • Password: CDP Workload Password

    • pic.png

  4. Under Advanced Settings, set the following parameters.
    • Connection Type: HTTP
    • HTTP path: /cliservice
    • Socket Type: SSLScreenshot 2021-01-26 at 10.15.16.png
  5.  Test the connection.
2,737 Views