Community Articles
- Cloudera Community
- Support
- Community Articles
- How to setup Cloudera Security/Governance/GDPR (Wo...
- Subscribe to RSS Feed
- Mark as New
- Mark as Read
- Bookmark
- Subscribe
- Printer Friendly Page
- Report Inappropriate Content
- Subscribe to RSS Feed
- Mark as New
- Mark as Read
- Bookmark
- Subscribe
- Printer Friendly Page
- Report Inappropriate Content
Created on
06-03-2020
07:40 PM
- edited on
08-08-2021
10:00 PM
by
subratadas
Security/Governance/GDPR Demo on CDP-Private Cloud Base 7.x
Summary
This article explains how to quickly set up Cloudera Security/Governance/GDPR (Worldwide Bank) demo using Cloudera Data Platform - Private Cloud Base (formerly known as CDP-Data Center). It can be deployed either on AWS using AMI or on your own setup via provided script
What's included
- Single node CDP 7.1.7 including:
- Cloudera Manager (60-day trial license included) - for managing the services
- Kerberos - for authentication (via local MIT KDC)
- Ranger - for authorization (via both resource/tag-based policies for access and masking)
- Atlas - for governance (classification/lineage/search)
- Zeppelin - for running/visualizing Hive queries
- Impala/Hive 3 - for Sql access and ACID capabilities
- Spark/HiveWarehouseConnector - for running secure SparkSQL queries
- Worldwide Bank artifacts
- Demo hive tables
- Demo tags/attributes and lineage in Atlas
- Demo Zeppelin notebooks to walk through a demo scenario
- Ranger policies across HDFS, Hive/Impala, Hbase, Kafka, SparkSQL to showcase:
- Tag-based policies across HDP components
- Row-level filtering in Hive columns
- Dynamic tag-based masking in Hive/Impala columns
- Hive UDF execution authorization
- Atlas capabilities like
- Classifications (tags) and attributes
- Tag propagation
- Data lineage
- Business glossary: categories and terms
- GDPR Scenarios around consent and data erasure via Hive ACID
- Hive ACID / MERGE labs
Option 1: Steps to deploy on your own setup
- Launch a vanilla Centos 7 VM (8 cores / 64GB RAM / 100GB storage) and perform the documented network prereqs. Then set up a single node CDP cluster using this GitHub (instead of "base" CM template choose the "wwbank_krb.json" template) as follows:
yum install -y git #setup KDC curl -sSL https://gist.github.com/abajwa-hw/bca3d23fe146c3ebd59a9b5fd19480a3/raw | sudo -E sh git clone https://github.com/fabiog1901/SingleNodeCDPCluster.git cd SingleNodeCDPCluster ./setup_krb.sh gcp templates/wwbank_krb.json #Setup worldwide bank demo using script curl -sSL https://raw.githubusercontent.com/abajwa-hw/masterclass/master/ranger-atlas/setup-dc-703.sh | sudo -E bash - Once the script completes, restart Zeppelin once (via CM) for it to pick up the demo notebooks
Option 2: Steps to launch prebuilt AMI on AWS
- Login in to the AWS EC2 console using your credentials
- Select the AMI from ‘N. California’ region by clicking one of the links below:
- Now choose instance type: select m4.4xlarge and click Next:
Note: If you choose a smaller instance type from the above recommendation, not all services may come up. - In Configure Instance Details, ensure Auto-assign Public IP is enabled and click Next:
- In Add storage, use at least 100 GB and click Next:
- In Add Tags, add tags needed to prevent instances from being terminated. Click Next:
- In Configure Security Group, create a new security group and select All traffic and open all ports to only your IP. The below image displays my IP address:
- In Review Instance Launch, review your settings and click Launch:
- Create and download a new key pair (or choose an existing one). Then click Launch instances:
- Click the shown link under Your instances are now launching:
- This opens the EC2 dashboard that shows the details of your launched instance:
- Make note of your instance’s Public IP (which will be used to access your cluster). If the Public IP is blank, wait for a couple of minutes for this to be populated.
- After five to ten minutes, open the below URL in your browser to access Cloudera Manager (CM) console: http://<PUBLIC IP>:7180.
- Login as admin/admin:
- At this point, CM may still be in the process of starting all the services. You can tell by the presence of the blue operation notification near the bottom left of the page. If so, just wait until it is done:
(Optional) You can also monitor the startup using the log as below:- Open SSH session into the VM using your key and the public IP e.g. from OSX:
ssh -i ~/.ssh/mykey.pem centos@<publicIP> - Tail the startup log:
tail -f /var/log/cdp_startup.log - Once you see “cluster is ready!”, you can proceed.
- Once the blue operation notification disappears and all the services show a green checkmark, the cluster is fully up.
- Open SSH session into the VM using your key and the public IP e.g. from OSX:
- If any services fail to start, use the hamburger icon next to SingleNodeCluster > Start button to start.
Accessing cluster resources
CDP urls
- Access CM at :7180 as admin/admin
- Access Ranger at :6080. Ranger login is admin/BadPass#1
- Access Atlas at :31000. Atlas login is admin/BadPass#1
- Access Zeppelin at :8885. Zeppelin users logins are:
- joe_analyst = BadPass#1
- ivanna_eu_hr = BadPass#1
- etl_user = BadPass#1
Demo walkthrough
Run queries as joe_analyst
- Open Zeppelin and login as joe_analyst. Find his notebook by searching for "worldwide" using the text field under the Notebook section. Select the notebook called Worldwide Bank - Joe Analyst:
- On the first launch of the notebook, you will be prompted to choose interpreters. You can keep the defaults. Ensure to click the Save button:
- Run through the notebook. This notebook shows the following:
- MRN/password masked via tag policy. The following shows the Ranger policy that enables this:
- In the Dynamic Column Level Masking, address, nationalID, credit card numbers are masked using Hive column policies specified in Ranger. Notice that birthday and age columns are masked using the custom mask:
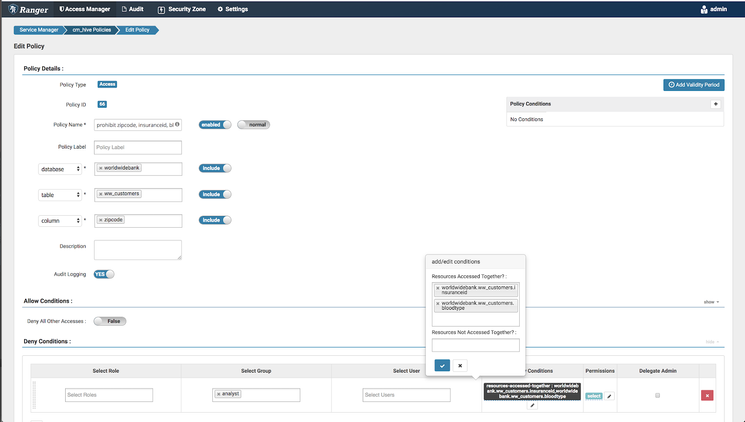
- It also shows a prohibition policy where zipcode, insuranceID, and blood type cannot be combined in a query:
- It shows tag-based policies.
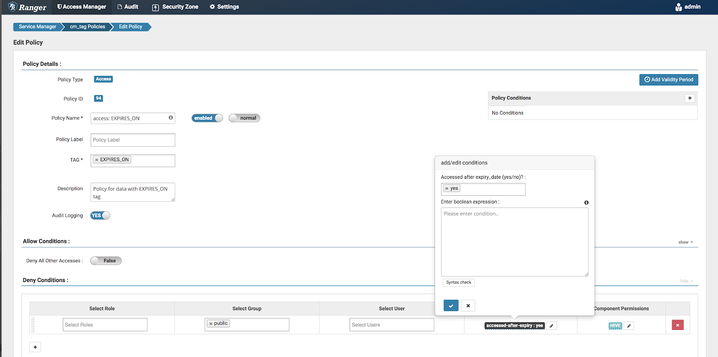
- Attempts to access an object tagged with EXPIRES_ON accessed after the expiry date will be denied. As we will show later, the fed_tax column of tax_2015 table is tagged in Atlas as EXPIRED_ON with an expiry date of 2016. Hence, it should not be allowed to be queried:
- Also attempts to access objects tagged with PII will be denied as per policy. Only HR is allowed. As we will show later, the SSN column of tax_2015 table is tagged as PII in Atlas:
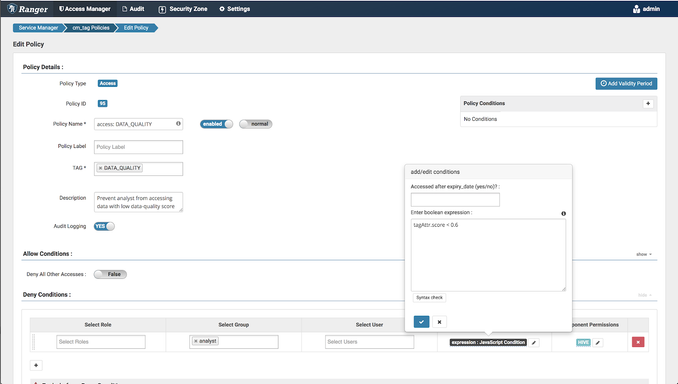
- Attempts to access cost_savings.claim_savings table as an analyst will fail because there is a policy that a minimum of 60% data quality score is required for analysts. As we will see, this table is tagged in Atlas as having a score of 51%:
- The same queries can also be run via SparkSQL via spark-shell (as described above). The following is the sample query for joe_analyst:
hive.execute("SELECT surname, streetaddress, country, age, password, nationalid, ccnumber, mrn, birthday FROM worldwidebank.us_customers").show(10)

hive.execute("select zipcode, insuranceid, bloodtype from worldwidebank.ww_customers").show(10)

hive.execute("select * from cost_savings.claim_savings").show(10)
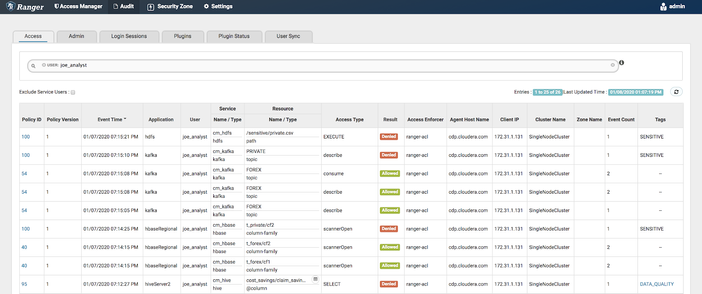
Confirm using Ranger audits that the queries ran as joe_analyst. Also, notice that column names, masking types, IPs, and policy IDs were captured. Also notice tags (such as DATA_QUALITY or PII) are captured along with their attributes. Also, notice that these audits were captured for operations across Hive, Hbase, Kafka, and HDFS:
- MRN/password masked via tag policy. The following shows the Ranger policy that enables this:
Run queries as ivanna_eu_hr
- Once services are up, open Ranger UI and also log in to Zeppelin as ivanna_eu_hr.
- Find her notebook by searching for hortonia using the text field under the Notebook section.
- Select the notebook called Worldwide Bank - Ivana EU HR:
- On the first launch of the notebook, you may be prompted to choose interpreters. You can keep the defaults, ensure you click Save button:
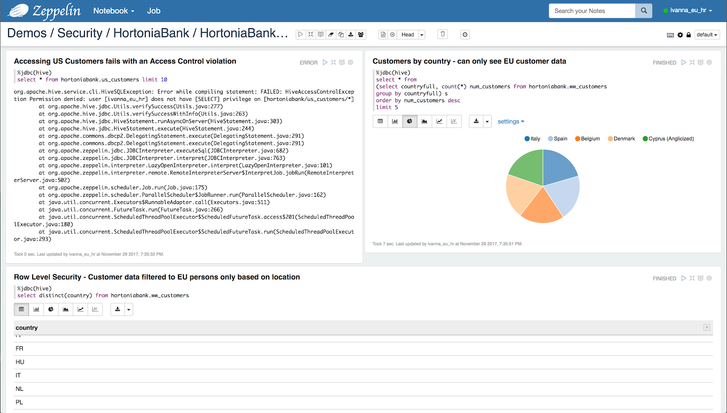
- Run through the notebook cells using Play button at the top right of each cell (or Shift-Enter):
- This notebook highlights the following:
- Row-level filtering: As Ivana can only see data for European customers who have given consent (even though she is querying ww_customers table which contains both US and EU customers). The following is the Ranger Hive policy that enables this feature:
- It also shows that since Ivana is part of the HR group, there are no policies that limit her access. Hence, so she can see raw passwords, nationalIDs, credit card numbers, MRN #, birthdays, etc.
- The last cells show that tag-based policies.
- Row-level filtering: As Ivana can only see data for European customers who have given consent (even though she is querying ww_customers table which contains both US and EU customers). The following is the Ranger Hive policy that enables this feature:
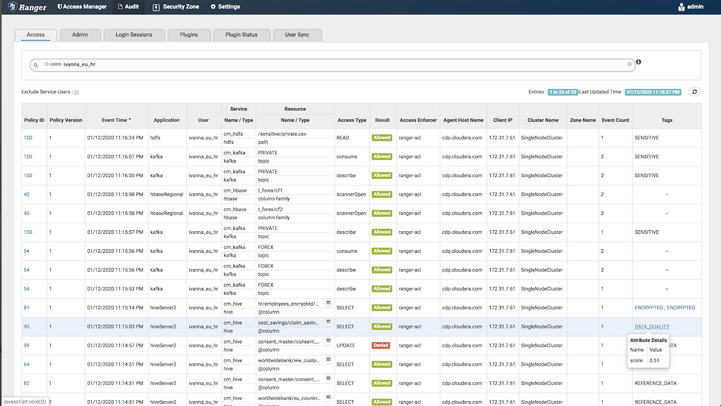
- Once you successfully run the notebook, you can open the Ranger Audits to show the policies and that the queries ran as her and that row filtering occurred (notice ROW_FILTER access type):
Run queries as etl_user
Similarly, you can log in to Zeppelin as etl_user and run his notebook as well
This notebook shows how an admin would handle GDPR scenarios like the following using Hive ACID capabilities:
- When a customer withdraws consent (so they no longer appear in searches)
- When a customer requests their data to be erased
Run Hive/Impala queries from Hue
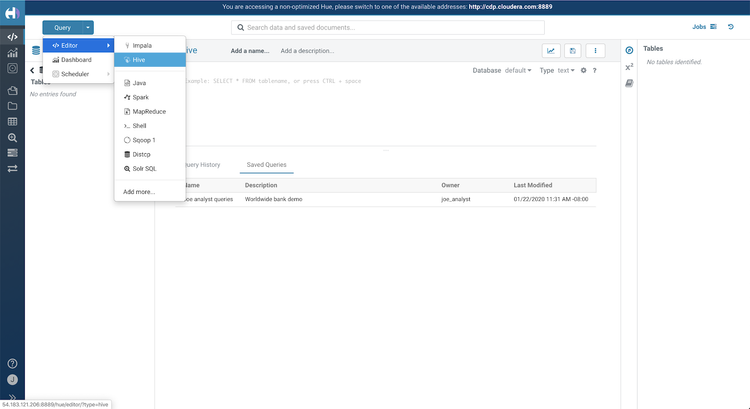
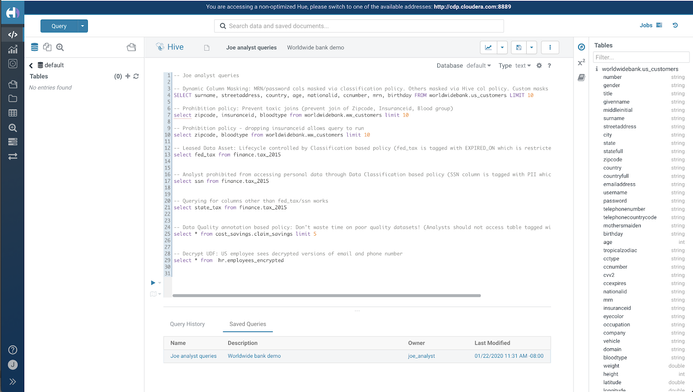
Alternatively, you can log in to Hue as joe_analyst and select Query > Editor > Hive, and click Saved queries to run Joe's sample queries via Hive:
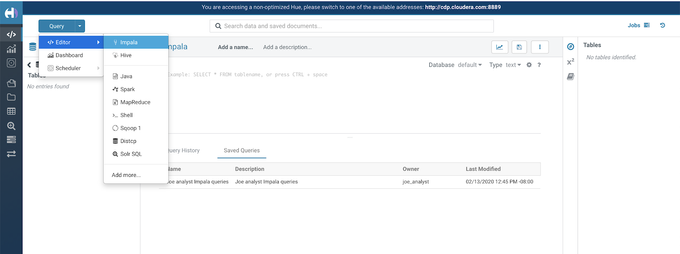
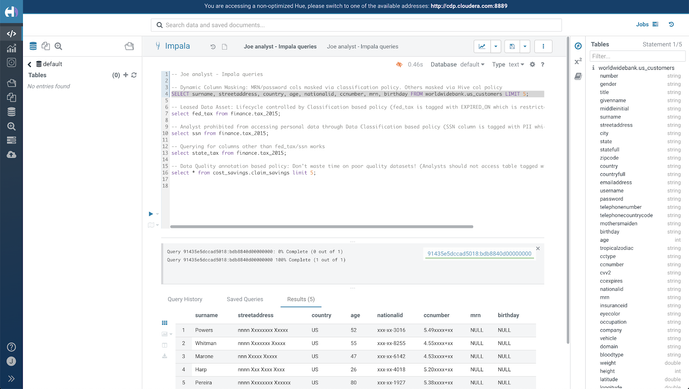
You can also switch the editor to Impala to run Joe's sample queries via Impala to show tag-based access policy working for Impala:
In CDP 7.1.1, Impala also supports column-based masking:
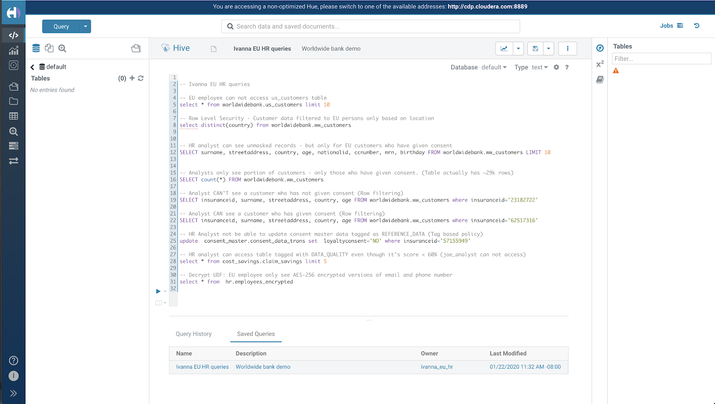
Alternatively, you can log in to Hue as ivanna_eu_hr and click Saved queries to run Ivanna's sample queries via Hive:
Run SparkSQL queries via Hive Warehouse Connector (HWC)
To run secure SparkSQL queries (using Hive Warehouse Connector):
- Connect to instance via SSH using your keypair
- Authenticate as the user you want to run queries as via keytabs:
kinit -kt /etc/security/keytabs/joe_analyst.keytab joe_analyst/$(hostname -f)@CLOUDERA.COM - Start SparkSql using HiveWarehouseConnector:
spark-shell --jars /opt/cloudera/parcels/CDH/jars/hive-warehouse-connector-assembly*.jar --conf spark.sql.hive.hiveserver2.jdbc.url="jdbc:hive2://$(hostname -f):10000/default;" --conf "spark.sql.hive.hiveserver2.jdbc.url.principal=hive/$(hostname -f)@CLOUDERA.COM" --conf spark.security.credentials.hiveserver2.enabled=false - Import HWC classes and start the session:
import com.hortonworks.hwc.HiveWarehouseSession import com.hortonworks.hwc.HiveWarehouseSession._ val hive = HiveWarehouseSession.session(spark).build() - Run queries using hive.execute(). Example:
hive.execute("select * from cost_savings.claim_savings").show(10) - The following is a sample script to automate above for joe_analyst here:
/tmp/masterclass/ranger-atlas/HortoniaMunichSetup/run_spark_sql.sh
Troubleshooting Zeppelin
In case you encounter Thrift Exception like the following, it's likely the session was expired:
Just scroll to the top and click the Gears icon (near top right) to display the interpreters and restart the JDBC one:
Atlas walkthrough
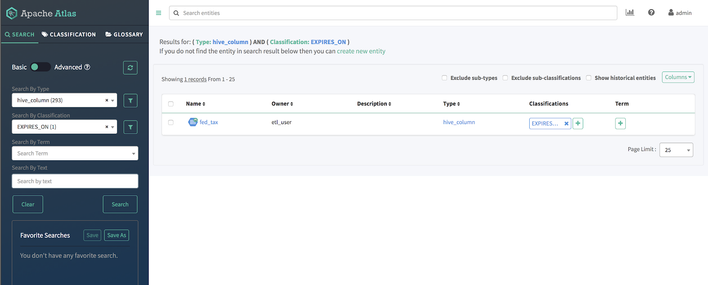
- Log in to Atlas and show the Hive columns tagged as EXPIRES_ON:
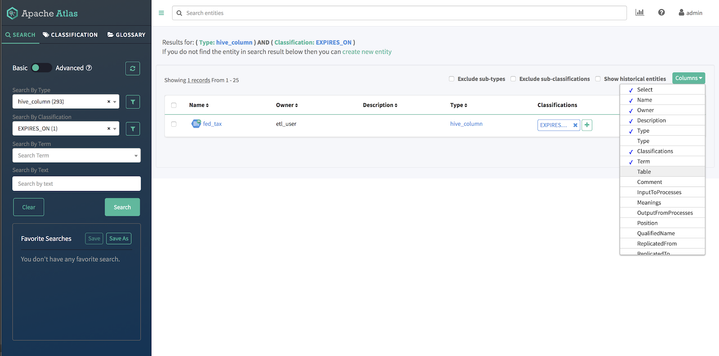
- To see the table name, you can select Table in the Column dropdown:
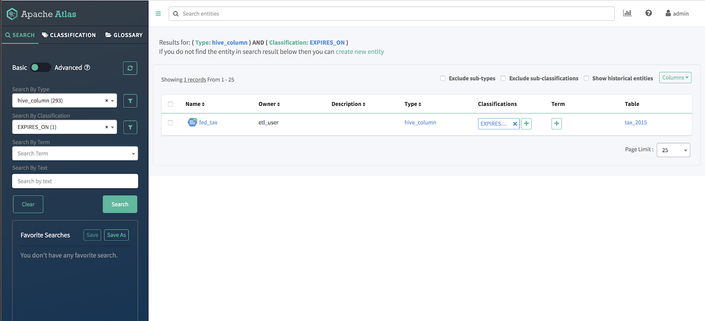
- Now, notice the table name is also displayed:
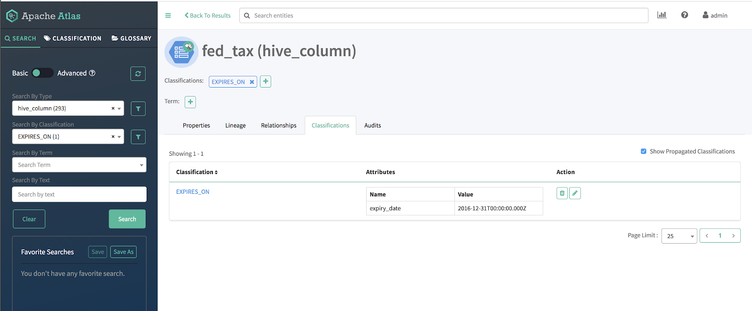
- Select the fed_tax column and open the Classifications tab to view the attributes of the tag (expiry_date) and value:
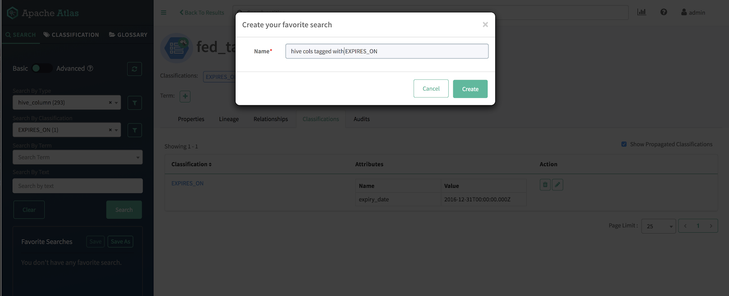
- To save this search, click the Save As button near the bottom left. Provide a Name and click Create to save:
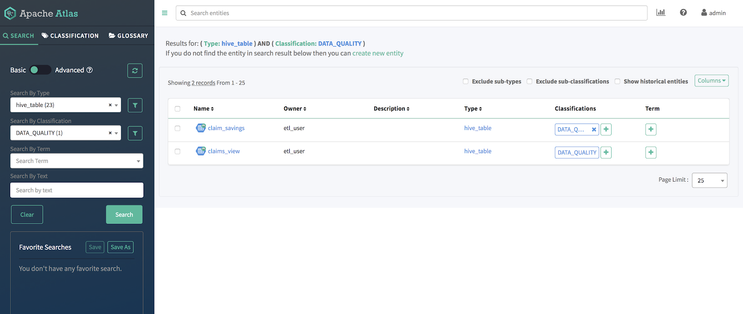
- Similarly, you can query for Hive tables tagged with DATA_QUALITY:
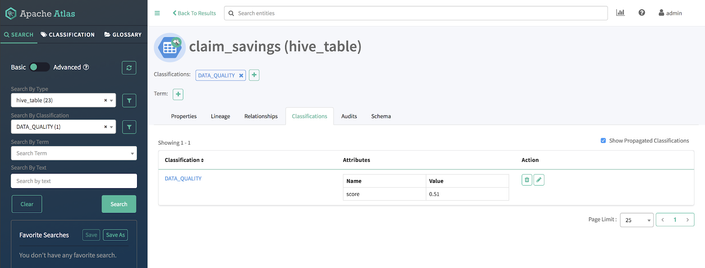
- Click on claim_savings to see that the quality score associated with this table is less than 60%:
- Click back, and select the claims_view table instead.
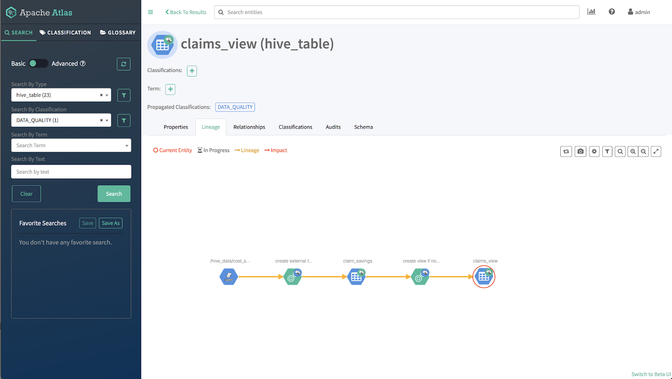
- Click the Lineage tab. This shows that this table was derived from the claims_saving table:
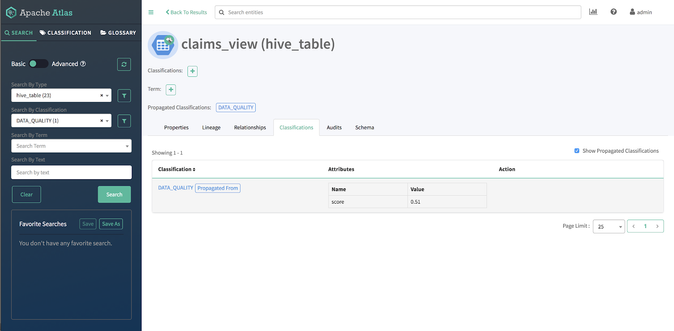
- Click on the Classifications tab and notice that because the table claims_view table was derived from (claims_savings) and had a DATA_QUALITY tag, the tag was automatically propagated to claims_view table itself (i.e. no one had to manually tag it):
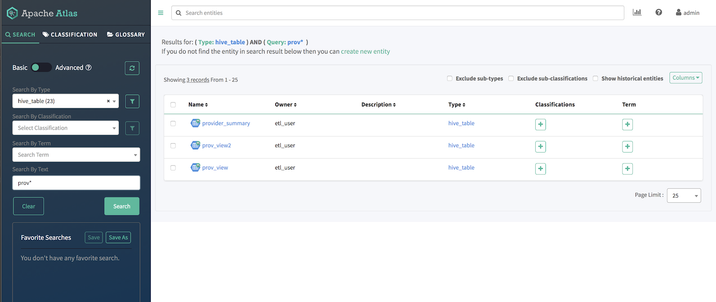
- Use Atlas to query for hive_tables and pick provider_summary to show lineage and impact:
- You can use the Audits tab to see audits on this table:
- You can use the Schema tab to inspect the table schema:
- Navigate to the Classification tab to see how you can easily see all entities tagged with a certain classification (across Hive, Hbase, Kafka, HDFS etc):
- Navigate to the Glossary tab to see how you can define Glossary categories and terms, as well as search for any entities associated with those terms:
- Navigate to Atlas home page and notice the option to create a new entity:
- The following is a sample out of the box entity types that you can create:
- Selecting an entity type (e.g. hdfs_path) displays the required and optional fields that you need to manually create the new entity:
Hive ACID/Merge walkthrough
- In Zeppelin, there are two Hive-related notebooks provided to demonstrate Hive ACID and MERGE capabilities. Log in to Zeppelin as etl_user to be able to run these:
- The notebooks contain tutorials that walk through some of the theory and concepts before going through some basic examples:
Appendix:
The following are some older AMI links (for HDP releases):
Created on 08-19-2020 07:02 AM
- Mark as Read
- Mark as New
- Bookmark
- Permalink
- Report Inappropriate Content
@abajwa , I have tried to use the given AMI and received the below message.
You currently do not have a Cloudera Data Platform License.

Please upload a valid license to access Cloudera Manager Admin Console. Your cluster is still functional, and all of your data remains intact.
Do you know how to get the 60 days trail version added to the given AMI file?
Thanks in advance
Created on 08-19-2020 06:29 PM
- Mark as Read
- Mark as New
- Bookmark
- Permalink
- Report Inappropriate Content
@AkhilTech thanks for your question. We just updated the article to include a link to a new AMI based on CDP 7.1.3. Alternatively, you can also use the script to deploy instead, which will give you a new trial license each time. To request a permanent license you can contact our sales team: https://www.cloudera.com/contact-sales.html
Created on 08-20-2020 03:40 AM
- Mark as Read
- Mark as New
- Bookmark
- Permalink
- Report Inappropriate Content
@abajwa , Thanks - I am able to use the new AMI
Created on 10-20-2020 06:07 PM - edited 10-20-2020 11:20 PM
- Mark as Read
- Mark as New
- Bookmark
- Permalink
- Report Inappropriate Content
I have a problem with the AMI
I'm using 0b3b57b9fa9a742ee so the: CDP-DC 7.1.3 with WorldWideBank demo v4
The machine has started but it is showing:
You currently do not have a Cloudera Data Platform License.
Are those images obsolete?
Created on 01-27-2021 12:14 PM - edited 01-27-2021 12:15 PM
- Mark as Read
- Mark as New
- Bookmark
- Permalink
- Report Inappropriate Content
Trying to get this working in a VMWare VM on an on-premise server. Running into a number of issues which I will try to troubleshoot but one thing that would help a lot, I think, is stating how much disk space is required at the outset. I have tried a couple of times and run into issues that seem to be related to not enough space on root or some other file system. I did find in a README that I probably need at least 100GB -- would have been useful to know that before I created the VM.
Sorry to complain but eager to get this working, finally, after a failed attempt about six months ago.
Created on 02-03-2021 01:06 PM
- Mark as Read
- Mark as New
- Bookmark
- Permalink
- Report Inappropriate Content
@boulder the AMI comes with trial license of CM which expires after 90 days. At that point, the services are all up but in order to open CM you would need to add a license.
Note: We just updated the article with an updated 7.1.4 AMI which has a fresh trial.
You can also use the script option to spin up a fresh cluster which gives a new trial license each time
@antonio_r thanks yes you'd need a VM with roughly the same specs as an m4.4xlarge would. Have updated the article with to include specs for option #1 as well
Created on 02-03-2021 01:15 PM - edited 02-03-2021 01:24 PM
- Mark as Read
- Mark as New
- Bookmark
- Permalink
- Report Inappropriate Content
Thanks for the clarification and for your efforts overall.
I tried the self-install on a Centos EC2 instance and that mostly worked. A number of the services report health issues-- HDFS shows up in CM as not starting, for example-- but surprisingly things seem to work anyway. I can run queries in the notebooks, for example, and the Ranger permissions apply.
I will revisit my home environment VM and see if I have better luck. (I give it ample resources -- 24 virtual CPUs and 96GB RAM and 150GB storage-- but I still seemed to hit issues.)
Are there any unusual features that the networking in EC2 provides vs. a vanilla VM? For example, the EC2 env answers at an internal AWS IP address as well as the public facing one. Do the services communicate with each other in some way that may require that? Do I need to reproduce that for my self-hosted VM to work? Do I, for example, need more than one virtual NIC?
Created on 02-03-2021 01:27 PM
- Mark as Read
- Mark as New
- Bookmark
- Permalink
- Report Inappropriate Content
@antonio_r after running the script, I noticed some services show weird state (even though they are up). You can restart "Cloudera Management Service" (scroll down to the bottom of the list of services, under Zookeeper)...that usually fixes it for me
Vanilla VM should work the same way...I have installed using the script on our internal Openstack env w/o issues. You should not require both internal/public IP. Just make sure the networking is setup as required by Hadoop: https://docs.cloudera.com/cloudera-manager/7.1.1/installation/topics/cdpdc-configure-network-names.h...
Created on 02-03-2021 01:28 PM - edited 02-03-2021 03:08 PM
- Mark as Read
- Mark as New
- Bookmark
- Permalink
- Report Inappropriate Content
thanks for the suggestion, I will investigate at next opportunity (probably over the weekend).
I am QUITE sure that I did not have the "Configure Network Names" steps done correctly when I tried several months ago, but I just couldn't figure out how to fix it. This should help quite a bit.
Created on 02-04-2021 07:44 PM - edited 02-04-2021 07:48 PM
- Mark as Read
- Mark as New
- Bookmark
- Permalink
- Report Inappropriate Content
Just make sure the networking is setup as required by Hadoop: https://docs.cloudera.com/cloudera-manager/7.1.1/installation/topics/cdpdc-configure-network-names.h...
That was the missing detail! For anyone else who tries this in VMWare
a) Do the network setup as described above on your host before you start the steps in this document
b) At the end of the networking instructions I struggled with
"Run host -v -t A $(hostname) and verify that the output matches the hostname command. The IP address should be the same as reported by ifconfig for eth0 (or bond0)..."
I found that I needed my own DNS server within the environment to make the networking stuff finally behave as described. I set up an instance of "dnsmasq" in my Centos Linux environment -- it's compact, lightweight, included with CentOS, and took about 3 minutes to configure, following the instructions here:
https://brunopaz.dev/blog/setup-a-local-dns-server-for-your-projects-on-linux-with-dnsmasq
About five lines of config and I was off to the races 🙂


