Our Community is getting an upgrade! To get everything ready for the relaunch, we’ll be placing the site in read-only mode starting September 21st.
We really appreciate your understanding while we get things set up behind the scenes. Catch up on all the exciting details about the move here.
Need help or have questions? Drop us a line at [email protected]

Community Articles

Find and share helpful community-sourced technical articles.
Announcements
Share your experience with Cloudera on G2 and get a $25 Amazon Gift card.
Hi, I'm CLEO! Something exciting is coming to the Community. Stay Tuned!

Labels (1)
avatar
Contributor
There may be a need to use Anaconda to set up a Python virtual environment or an R environment to run SparklyR on the CDP Public Cloud Datahub cluster. CDP Public Cloud provides "Recipe" as extensions to install additional software on top of the base image. In this post, we will use Recipe with a sample script to accomplish this.
  1. Download this bootstrap/ recipe script for Anaconda install.
    wget https://raw.githubusercontent.com/karthikeyanvijay/cdp-publiccloud/main/datahub-recipes/setup-anaconda.sh
  2. Ensure the parameters in the first section of the script. Modify them as required. The USER_GROUP_ADMIN will be the owner of the directory where Anaconda will be installed. ACLs are added to the directory for USER_GROUP_1 and USER_GROUP_2 for sufficient access. If you just have one user group, remove all lines containing USER_GROUP_2 from the script. TAR_FILE_PATH is the packaged Python/ R tarball that can be submitted in the YARN jobs (this way we do not have to install the Python/ R environment on all hosts on the cluster).
    ANACONDA_PATH=/hadoopfs/fs1/anaconda3
    ANACONDA_DOWNLOAD_FILE=Anaconda3-2020.11-Linux-x86_64.sh
    ANACONDA_DOWNLOAD_URL=https://repo.anaconda.com/archive/${ANACONDA_DOWNLOAD_FILE}
    ANACONDA_DOWNLOAD_PATH=/tmp
    USER_GROUP_ADMIN=sandbox-default-ps-admin
    USER_GROUP_1=ps-sandbox-aws-env-user-group
    USER_GROUP_2=cdp_sandbox_workers_ww
    TAR_FILE_PATH=/hadoopfs/fs1
  3. If you do not require an R or Python environment setup, you can remove the corresponding section in the script.
  4. Also, update the required packages for the workloads to be installed in the Python and/ or R sections.
  5. You can now test this script independently, if possible, to ensure that there are no syntax errors and it will work as expected.
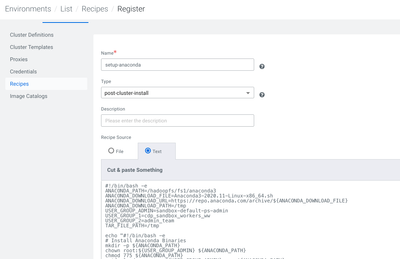
  6. Upload the script into the recipe section in the CDP Control plane.setup-recipe-conda.png
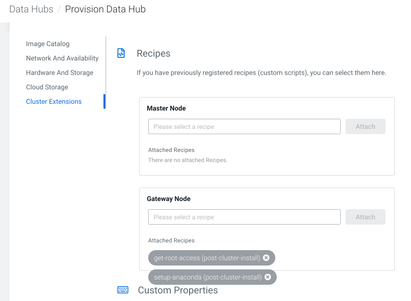
  7. You can now attach the recipe during cluster provisioning. Here is an example where the 'setup-anaconda' recipe is attached to the gateway host.
    root+conda-recipe.png
  8. Once the cluster is built, you should see the tar.gz files in the TAR_FILE_PATH path and should also have access to the conda commands on the node(s) where the recipe(s) were executed. Please note that the user has to run the command conda init bash before running these commands. Here is a view of the commands from the gateway node.
    conda-dh-cluster-ouput.png

-------------

Vijay Anand Karthikeyan

4,623 Views
0 Kudos