Community Articles
- Cloudera Community
- Support
- Community Articles
- Building Basic Flows with Nipyapi
- Subscribe to RSS Feed
- Mark as New
- Mark as Read
- Bookmark
- Subscribe
- Printer Friendly Page
- Report Inappropriate Content
- Subscribe to RSS Feed
- Mark as New
- Mark as Read
- Bookmark
- Subscribe
- Printer Friendly Page
- Report Inappropriate Content
Created on 09-10-2019 08:06 AM - edited 09-10-2019 09:02 AM
Building Basic Flows with Nipyapi
If building flows in NiFi wasn't easy enough, developers can use the Nipyapi library to build flows with python. With this model, one can programmatically build flows without having access to the canvas. This comes in handy when deploying highly configurable and repeatable flows.
In this simple example below, we'll walk through using the python libraries to build a very simple flow whereby we use the GenerateFlowFile processor to write data to the local file system. Very contrived but one can get the picture of the flexibility afforded by the nipyapi libraries.
For more information on the python libraries discussed here, please go to:
https://nipyapi.readthedocs.io/en/latest/index.html
First things first, you'll need to import the required library and classes for the example.
from nipyapi import canvas,config
from random import randrange
Next set the configuration details of your NiFi environment. Here, I'm setting the api connection details for both NiFi and NiFi Registry
config.nifi_config.host = 'http://localhost:8080/nifi-api'
config.registry_config.host = 'http://localhost:18080/nifi-registry-api'
With NiFi the canvas is where you visually place the various processors you use in your flows. By using python, you can't visually place anything. Therefore we must give the coordinates of where we want the processors to be placed. Here, I'm using a simple random function to derive a coordinate point between 0 and 4000. This will randomly place the processors on the canvas.
location_x = randrange(0,4000)
location_y = randrange(0,4000)

location = (location_x, location_y)
NiFi has a ton of configuration properties for each individual processor. Some are required while others are optional. In order to tackle all of the required properties for this example, we must pass in a configuration that tells NiFi how to set up the processor. See the Configuration for more details.
See my article on using the chrome browser to help generate these processor configuration files. Click here for information on how to do this.
##send in configuration details for customizing the processors
processor_GenFlowFile_config = {"properties":{"generate-ff-custom-text":"hello world"},"schedulingPeriod":"10 sec","schedulingStrategy":"TIMER_DRIVEN"}
processor_PutFile_config = {"properties":{"Directory":"${dir}","Conflict Resolution Strategy":"replace","Maximum File Count":100},"autoTerminatedRelationships":["failure","success"]}
In order to place a new processor group on the canvas, we need to find the root procesor group which happens to be the canvas you see when you log into NiFi. This is quite simple:
##get the root processgroup ID
root_id = canvas.get_root_pg_id()
Next, we'll need to pull all the metadata about this processor group in order to create process groups on the canvas.
##get the root process group
root_process_group = canvas.get_process_group(root_id, 'id')
With all this information, we can now create a new processor group that our test flow will live in.
##create the processor group
new_processor_group = canvas.create_process_group(root_process_group, 'test_process_group', location, 'this is a test')
Next, we'll need to get the processors we'd like to implement. This code, searches the list of processor types and retrieves the processor we selected. The search criteria is the java processor class name.
##get the processors
processor_GenFlowFile = canvas.get_processor_type('org.apache.nifi.processors.standard.GenerateFlowFile', identifier_type='name')
processor_PutFile = canvas.get_processor_type('org.apache.nifi.processors.standard.PutFile', identifier_type='name')
In this step, we are placing the processors in our newly created processor group. In this code snippet, for each processor, i'm passing in the the processor group object, the processor object, the location I want the processor to live as well as the configuration files for each.
##put processors on canvas in specificed process group
GenFlowFile = canvas.create_processor(new_processor_group, processor_GenFlowFile,(randrange(0,4000),randrange(0,4000)),name=None,config=processor_GenFlowFile_config)
PutFile = canvas.create_processor(new_processor_group, processor_PutFile,(randrange(0,4000),randrange(0,4000)),name=None,config=processor_PutFile_config)
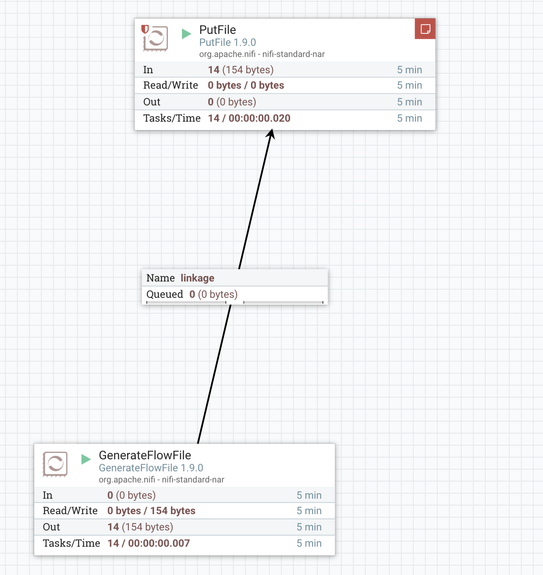
Once the processor have been created, linkages between the processor can be established. Here, the processors that were created in the previous step are used to establish the relationship between them.
##canvas create connection between processors
canvas.create_connection(GenFlowFile, PutFile ,relationships=None, name="linkage")
The second to last step involves setting any variables for the processor group. This method will allow you to customize any configuration files you used in the prior steps. If you look at the step where the configuration files were defined, you'll see 2 keys where the values are NiFi variables, ${file_count} and ${dir}. All that needs to be done is set the variables in the registry to parameterize your flow.
##get variable registry
var_reg = canvas.get_variable_registry(new_processor_group, True)

##set new variables from incoming file
canvas.update_variable_registry(new_processor_group,([('dir', '/tmp/test')]))
Finally, start the processor flow.
##start process group
canvas.schedule_process_group(new_processor_group.id, True)
To see the newly running flow, go to the canvas. The processor group should be running. Mine has a error and thats due to the file limits I built into my configuration files (no more than 100 files in a directory)
Going into the processor group you should see the two processors we defined:
Given the random nature of putting the processors on the canvas, they may be really spread out so you may need to adjust them on the canvas to see them clearly.
There you have it! A simple flow built by the nipyapi! I hope this demonstrates the powerful capabilities of the nipyapi and how it can be used to create customizable flows...it certainly beats having to write REST calls!


