Community Articles
- Cloudera Community
- Support
- Community Articles
- Simple Credit Card Fraud Detection with NiFi, Kafk...
- Subscribe to RSS Feed
- Mark as New
- Mark as Read
- Bookmark
- Subscribe
- Printer Friendly Page
- Report Inappropriate Content
- Subscribe to RSS Feed
- Mark as New
- Mark as Read
- Bookmark
- Subscribe
- Printer Friendly Page
- Report Inappropriate Content
Created on
03-31-2022
03:25 PM
- edited on
03-31-2022
08:54 PM
by
subratadas
Intro
Online shopping is on the rise as more of us stay at home and let our credit cards do the walking. Keeping pace with that trend is an unfortunate increase in credit card fraud.
It’s no surprise, really. According to Forbes, online fraud has been a growing problem for the past few years. And now, as consumers and businesses adapt to the worldwide pandemic and make more credit card transactions in the card-not-present (CNP) space, the resulting uptick in online shopping and e-commerce has opened up an even bigger playground for fraudsters to try out new tricks.
Fraud detection has been a major issue for financial services and institutions. But artificial intelligence has an enormous potential to reduce financial fraud. Artificial intelligence applications have a great potential to detect and prevent fraud.
Therefore, we will start a series of articles talking about that and how we can use Cloudera mechanisms to implement a whole Credit Card Fraud detection solution. But first, let's begin with a simple way to implement that:
Keep It Simple
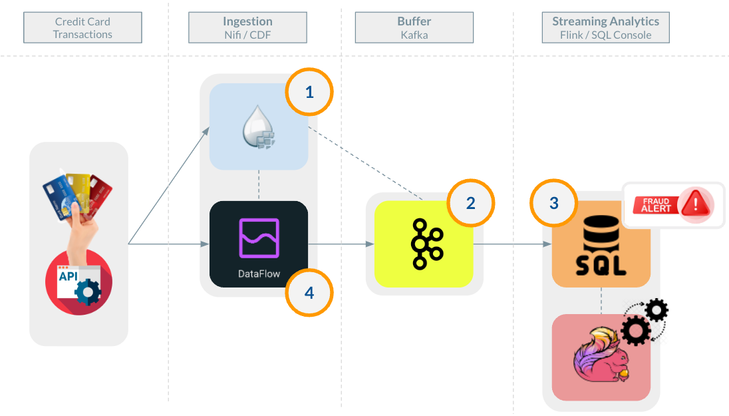
On this MVP, let's start by using Apache NiFi to ingest and transforming simulated data from a public API, converting that data into data in the format expected by our fraud detection algorithm, throwing that data into an Apache Kafka topic, and using Apache Flink's SQL console to process a simple fraud detection algorithm. All of this will be even better with scalability, so the icing on the cake will be to convert the data transformation ingest flow into Cloudera Data Flow Services with Kubernetes.
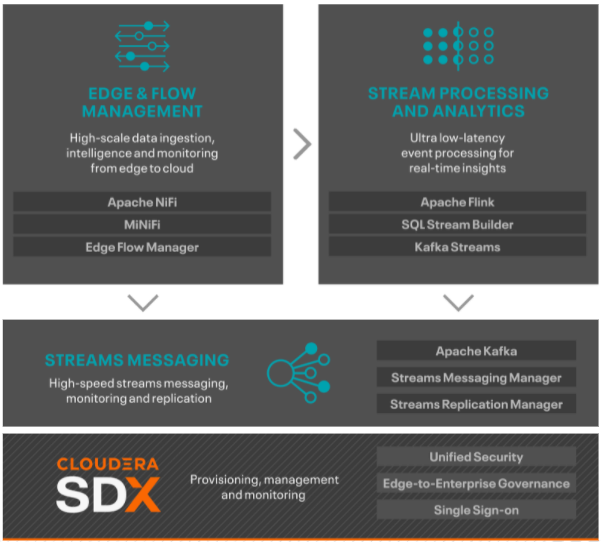
All commented components are available in CDF (Cloudera Data Flow) and CSA Cloudera Streaming Analytics:
CLOUDERA DATA-IN-MOTION PLATFORM
Prerequisites
|
We will use CDP Public Cloud with CDF, and CSA data hubs: 
Data Hub: 7.2.14 - Flow Management Light Duty with Apache NiFi, Apache NiFi Registry 
Data Hub: 7.2.14 - Streams Messaging Light Duty: Apache Kafka, Schema Registry, Streams Messaging Manager, Streams Replication Manager, Cruise Control 
Data Hub: 7.2.14 - Streaming Analytics Light Duty with Apache Flink |
1 - Data ingestion

Let's get started ingesting our data in NiFi. With InvokeHTTP Processor, we can collect all data from randomuser API.
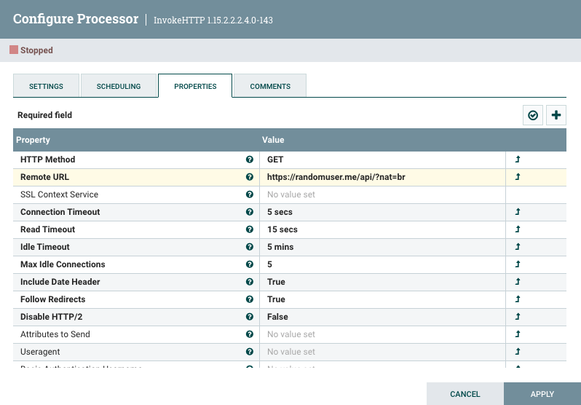
A simple call to: https://randomuser.me/api/?nat=br will return something like this:
{
  "results": [
    {
      "gender": "female",
      "name": {
        "title": "Miss",
        "first": "Shirlei",
        "last": "Freitas"
      },
      "location": {
        "street": {
          "number": 6133,
          "name": "Rua Santa Luzia "
        },
        "city": "Belford Roxo",
        "state": "Amapá",
        "country": "Brazil",
        "postcode": 88042,
        "coordinates": {
          "latitude": "78.0376",
          "longitude": "74.2175"
        },
        "timezone": {
          "offset": "+11:00",
          "description": "Magadan, Solomon Islands, New Caledonia"
        }
      },
      "email": "shirlei.freitas@example.com",
      "login": {
        "uuid": "d73f9a11-d61c-424d-8309-51d6d8e83a73",
        "username": "organicfrog175",
        "password": "1030",
        "salt": "yhVkrYWm",
        "md5": "2bf9beb695c663a0a83aa060f27629c0",
        "sha1": "f4dfdef9f2d2a9d04a0622636d0851b5d000164a",
        "sha256": "e0a96117182914b3fa7fef22829f6692607bd58eb012b8fee763e34b21acf043"
      },
      "dob": {
        "date": "1991-09-06T08:31:08.082Z",
        "age": 31
      },
      "registered": {
        "date": "2009-06-26T00:02:49.893Z",
        "age": 13
      },
      "phone": "(59) 5164-1997",
      "cell": "(44) 4566-5655",
      "id": {
        "name": "",
        "value": null
      },
      "picture": {
        "large": "https://randomuser.me/api/portraits/women/82.jpg",
        "medium": "https://randomuser.me/api/portraits/med/women/82.jpg",
        "thumbnail": "https://randomuser.me/api/portraits/thumb/women/82.jpg"
      },
      "nat": "BR"
    }
  ],
  "info": {
    "seed": "fad8d9259d3f2b0b",
    "results": 1,
    "page": 1,
    "version": "1.3"
  }
}
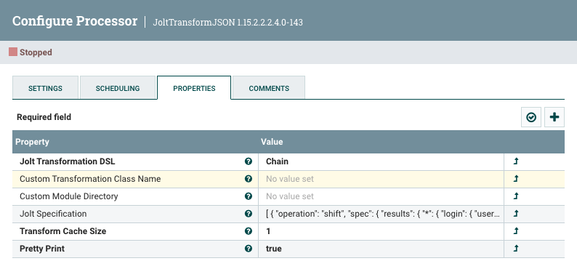
Using JoltTransformJSON processor, we can easily transform this previous Json to our JSON structure:
We are going to use JOLT transformation to clean and adjust our data:
[
  {
    "operation": "shift",
    "spec": {
      "results": {
        "*": {
          "login": { "username": "customer_id", "uuid": "account_number" },
          "name": { "first": "name", "last": "lastname" },
          "email": "email",
          "gender": "gender",
          "location": {
            "street": { "number": "charge_amount" },
            "country": "country",
            "state": "state",
            "city": "city",
            "coordinates": {
              "latitude": "lat",
              "longitude": "lon"
            }
          },
          "picture": { "large": "image" }
        }
      }
    }
  },
  {
    "operation": "default",
    "spec": {
      "center_inferred_lat": -5.0000,
      "center_inferred_lon": -5.0000,
      "max_inferred_distance": 0.0,
      "max_inferred_amount": 0.0
    }
    },
  {
    "operation": "modify-overwrite-beta",
    "spec": {
      "lat": "=toDouble",
      "lon": "=toDouble"
    }
  }
]
And our output transformed data will be:
Result:
{
  "customer_id" : "organicfrog175",
  "account_number" : "d73f9a11-d61c-424d-8309-51d6d8e83a73",
  "name" : "Shirlei",
  "lastname" : "Freitas",
  "email" : "shirlei.freitas@example.com",
  "gender" : "female",
  "charge_amount" : 6133,
  "country" : "Brazil",
  "state" : "Amapá",
  "city" : "Belford Roxo",
  "lat" : 78.0376,
  "lon" : 74.2175,
  "image" : "https://randomuser.me/api/portraits/women/82.jpg",
  "max_inferred_distance" : 0.0,
  "center_inferred_lat" : -5.0,
  "center_inferred_lon" : -5.0,
  "max_inferred_amount" : 0.0
}
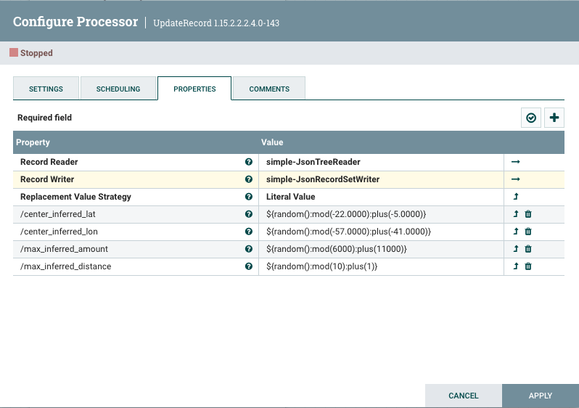
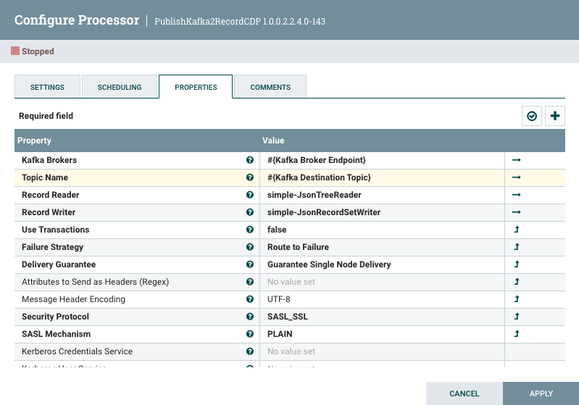
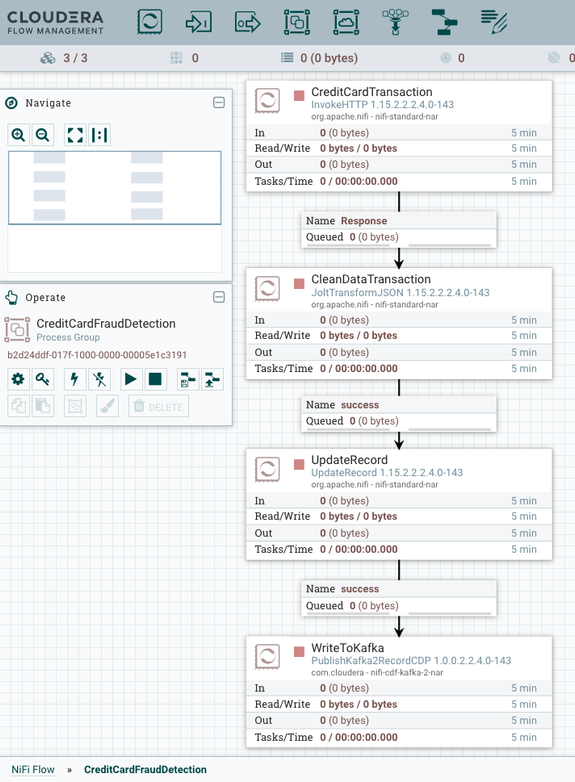
Now, we can use the UpdateRecord processor to improve that and get some random numbers in some fields, and so, put our JSON data in Kafka using PublishKafka2RecordCDP Processor.
UpdateRecord Processor
PublishKafka2RecordCDP Processor
(It's important to pay attention to Kafka brokers variables that must be filled according to Kafka Cluster endpoints.)
In the end, our NiFi flow will be something like this:
(You can download this flow definition attached to this article)
2 - Data Buffering
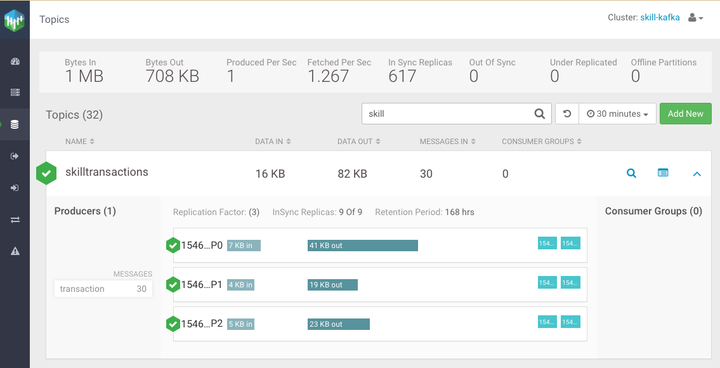
On Kafka Clusters, we can create a new Kafka topic just by hitting the button "Add new" in the SMM (Streaming Messaging Manager) component: I've created the skilltransactions as an example.
Once we already have NiFi flow and Kafka topic created, it is time to turn on your flow and see our data getting into our Kafka topic. You can also take a look at data explorer icons to see all ingested data so far.
3 - Streaming SQL Analytics
Apache Flink is an open-source, unified stream-processing and batch-processing framework developed by the Apache Software Foundation. Flink provides a high-throughput, low-latency streaming engine as well as support for event-time processing and state management.
Flink's Table API is a SQL-like expression language for relational stream and batch processing that can be embedded in Flink's Java and Scala DataSet and DataStream APIs. The Table API and SQL interface operate on a relational Table abstraction. Tables can be created from external data sources or existing DataStreams and DataSets.
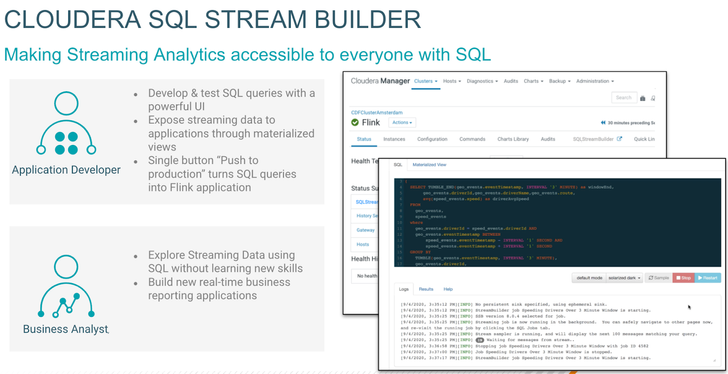
Cloudera has developed an application called Cloudera SQL Stream Builder that can map our Kafka Topics and query all data as a table through Flink's Table API.
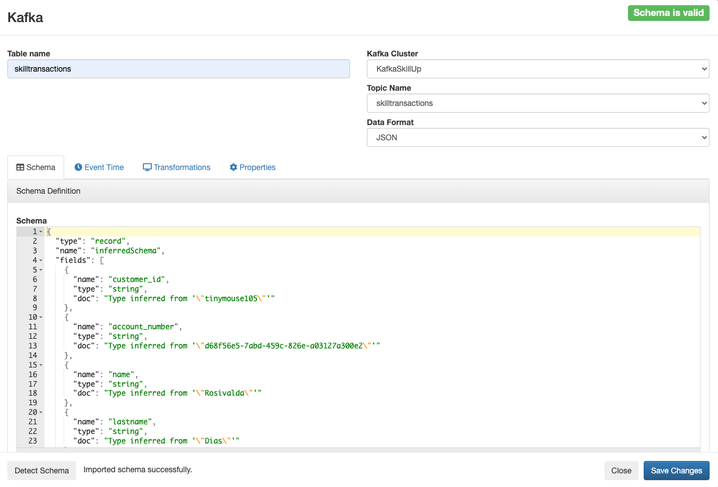
We will easily create our "virtual table" mapping on Table Connector on SSB:
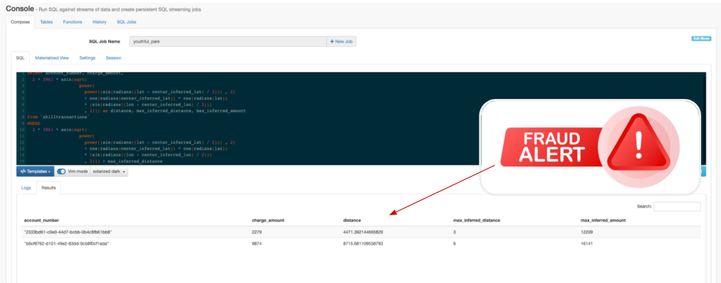
After creating this "virtual table" we can use SQL to do some mathematical calculations on how far a transaction has been made using power, sin, and radians SQL functions:
select account_number, charge_amount,
  2 * 3961 * asin(sqrt(
                    power(
                      power((sin(radians((lat - center_inferred_lat) / 2))) , 2)
                      + cos(radians(center_inferred_lat)) * cos(radians(lat))
                      * (sin(radians((lon - center_inferred_lon) / 2)))
                      , 2))) as distance, max_inferred_distance, max_inferred_amount
from `skilltransactions`
WHERE
  2 * 3961 * asin(sqrt(
                    power(
                      power((sin(radians((lat - center_inferred_lat) / 2))) , 2)
                      + cos(radians(center_inferred_lat)) * cos(radians(lat))
                      * (sin(radians((lon - center_inferred_lon) / 2)))
                      , 2))) > max_inferred_distance
To see more details about this query, please visit this great article by @sunile_manjee, on our Cloudera Community.
We can also create our function and just call it on or query.
For instance, let's create a DISTANCE_BETWEEN function and use it on our final query.
Final query
select account_number, charge_amount, DISTANCE_BETWEEN(lat, lon, center_inferred_lat, center_inferred_lon) as distance, max_inferred_distance, max_inferred_amount
from `skilltransactions`
WHERE DISTANCE_BETWEEN(lat, lon, center_inferred_lat, center_inferred_lon) > max_inferred_distance
OR charge_amount > max_inferred_amount
At this moment, our query should be able to detect suspicious transactions in real-time and you can call the police. 😜
But Wait! There's more!
It's time to see it in Production mode!
4 - From Development to Production
With this architecture, maybe you will face some issues on a BlackFriday or a big event like that. For that, you will need to ingest all streaming data with high performance and scalability; in other words… NiFi in Kubernetes.
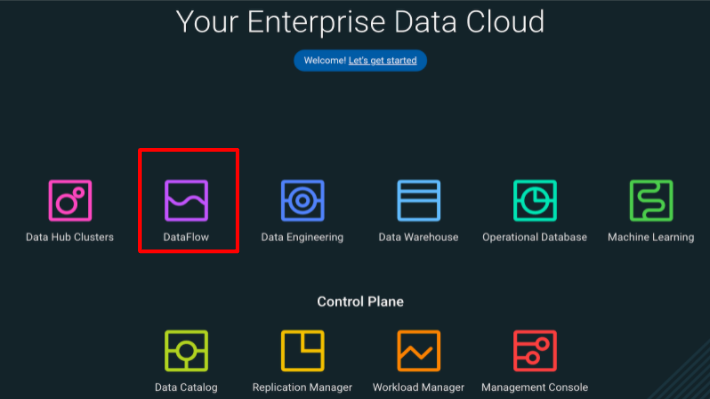
Cloudera DataFlow service can deploy NiFi flows in Kubernetes, providing all scalability needed for a production environment.
CLOUDERA DATA FLOW SERVICE – PUBLIC CLOUD
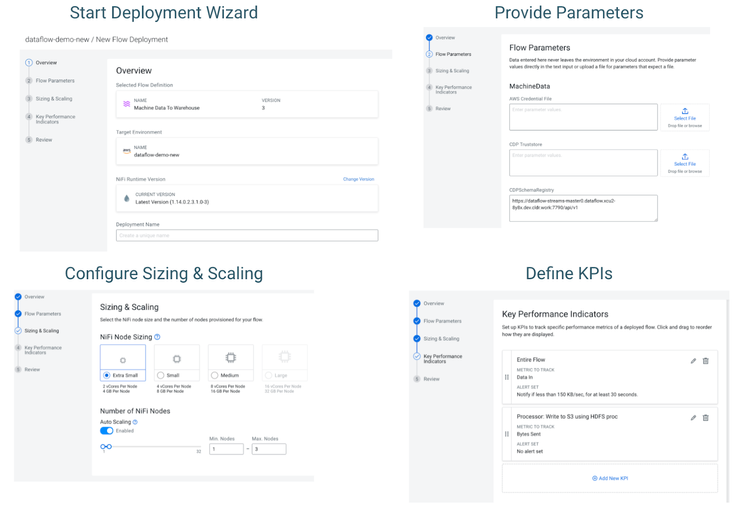
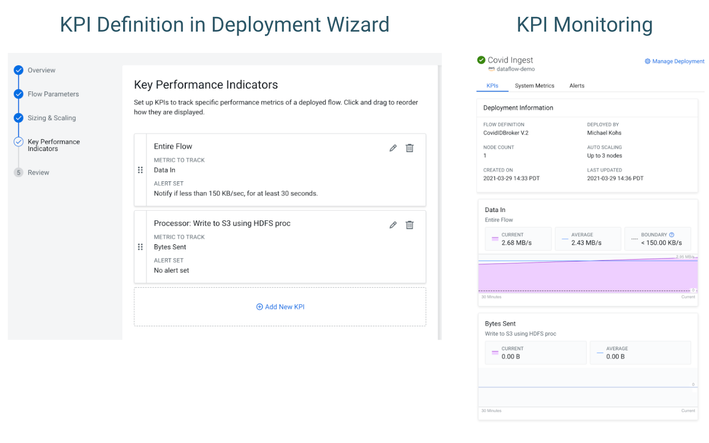
Follow the deployment wizard to see your flow living in containers mode:
DEPLOYMENT WIZARD
KEY PERFORMANCE INDICATORS
DASHBOARD
DEPLOYMENT MANAGER
5 - Conclusion
This is the very first article on this streaming journey; here we can use Cloudera Data Flow to ingest, buffer, process events in real-time. I hope after this article you can understand CDF and CSA, see all Cloudera Streaming capabilities, and after all, also call the police.
See you in the next article, where we will use machine learning on Kubernetes (Cloudera Machine Learning) to accurate our Simple Credit Card Fraud Detection and go live in production.

