Community Articles
- Cloudera Community
- Support
- Community Articles
- Custom Parcels - How to distribute your own librar...
- Subscribe to RSS Feed
- Mark as New
- Mark as Read
- Bookmark
- Subscribe
- Printer Friendly Page
- Report Inappropriate Content
- Subscribe to RSS Feed
- Mark as New
- Mark as Read
- Bookmark
- Subscribe
- Printer Friendly Page
- Report Inappropriate Content
Created on 04-07-2022 01:23 AM
When we develop applications for the Cloudera Data Platform, it is quite often necessary to use third-party libraries like NumPy, SciPy, Pandas, etc, or even different versions of existing components, such as Python.
On the other hand, installing and maintaining Python environments can be a complex and time-consuming task for a system administrator and extra caution needs to be taken when we talk about installing other versions of Python and its modules at the operating system level due to the requirements of Cloudera Manager and Cloudera Runtime.
You could also choose to install Python virtual environments, but that would still require effort to keep all cluster nodes up to date. Running python in virtual environments in YARN mode requires extra development effort and a significant increase in the total application size due to dependencies.
Another excellent option is to distribute Anaconda as a parcel, but be aware that generating custom parcels requires the Anaconda Enterprise version.
What's the best option for me?
During Cloudera's Professional Services engagement sessions, many development teams and CDP administrators ask me what is the best way to solve this.
There is no easy answer to this question. As clusters are often shared across multiple teams and often managed by yet another, it becomes very difficult to achieve a common solution that everyone likes.
Although there is no simple solution for all types of scenarios, I was able to extract some important requirements, common to all cases:
- It should be simple to build and maintain
- It should be easy to install and update
- The install and update process should be automated
- It must have low or no dependency on other OS libraries
- Most popular modules must be pre-installed
Solution proposal
Note: The proposal below is intended to serve as a reference only. When using it, be sure to test it properly in a non-productive environment.
To achieve our goal, the proposal is to use Parcels as a means of controlling versioning and distribution on all cluster nodes.
What are parcels?
According to official Cloudera documentation:
Parcels are self-contained and installed in a versioned directory, which means that
multiple versions of a given parcel can be installed side-by-side. You can then
designate one of these installed versions as the active one.
Solution Lifecycle
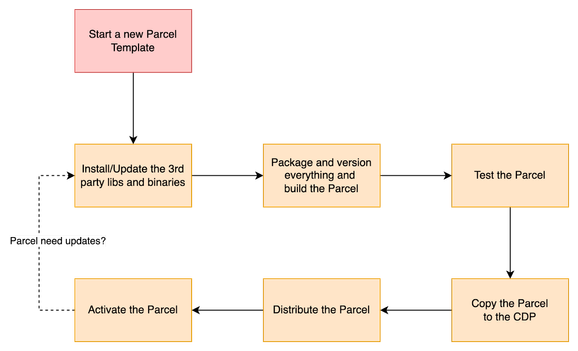
The diagram below explains the lifecycle of the proposed solution:

As you may have noticed, the dotted line represents that a change was required, and therefore, a new version should be built.
In the next steps, for illustrative purposes only, we will create a customized version of a Parcel containing Python 3.6 and the Pandas library.
Creating a new Parcel
For the following steps, I assume you have a Linux server with a RedHat or compatible version, Internet access, and basic Unix knowledge.
STEP 1: Prepare your environment
For the following steps, it is necessary to download and compile the Cloudera Manager Extensions:
- Install git:
yum install -y git - Install Java JDK:
yum install -y java-1.8.0-openjdk - Install Maven 3:
yum install -y maven - Clone the cm_ext project:
git clone https://github.com/cloudera/cm_ext.git - Go to the Validator Project directory:
cd cm_ext/validator - Build Validator:
mvn package - Look at the target directory and make sure the validator.jar exists as we will use it later:
ls target/validator.jar
STEP 2: Start a new Parcel
- Create a directory for your our Parcel:
mkdir -p /usr/local/parcels/MY_CONDA-3.6.10-0 - Notice that the version could be any version you want, as long as you follow the PACKAGENAME-VERSION format.
- Go to the Parcel directory:
cd /usr/local/parcels/MY_CONDA-3.6.10-0
STEP 3: Download and install the Miniconda
- Download miniconda from https://docs.conda.io/en/latest/miniconda.html
- Install miniconda in /usr/local/parcels/MY_CONDA-3.6.10-0/miniconda3 and don't forget to read and agree with the licensing terms:
bash /path/to/Miniconda3-latest-Linux-x86_64.sh - Go to the Parcel directory:
cd /usr/local/parcels/MY_CONDA-3.6.10-0 - Install the Python 3.6.10 version:
miniconda3/bin/conda install python=3.6.10 - Check Python version:
miniconda3/bin/python --version - Install pandas:
miniconda3/bin/conda install pandas - At this point, you can install other required Python libraries.
STEP 4: Setup your Parcel
- Go to the Parcel directory:
cd /usr/local/parcels/MY_CONDA-3.6.10-0 - Create a meta-directory:
mkdir meta - Create a meta/parcel.json file:
{ "schema_version": 1, "name": "MY_CONDA", "version": "3.6.10-0", "setActiveSymlink": true, "depends": "", "replaces": "", "conflicts": "", "provides": [ ], "scripts": { "defines": "my_conda_env.sh" }, "packages": [ ], "components": [ { "name" : "miniconda3", "version" : "4.10.3", "pkg_version": "4.10.3", "pkg_release": "4.10.3" }, { "name" : "python", "version" : "3.6.10", "pkg_version": "3.6.10", "pkg_release": "3.6.10" } ], "users": { "spark": { "longname" : "Spark", "home" : "/var/lib/spark", "shell" : "/usr/sbin/nologin", "extra_groups": [ ] } }, "groups": [ ] } - Create an empty meta/my_conda_env.sh file:
#!/bin/sh # EOF - Validate the parcel.json file:
java -jar /path/to/validator.jar -p /usr/local/parcels/MY_CONDA-3.6.10-0/meta/parcel.json - Validate the parcel's directory:
java -jar /path/to/validator.jar -d /usr/local/parcels/MY_CONDA-3.6.10-0/ - Move to the parent directory:
cd.. - And, package the parcel as TAR.GZ targeting to a RedHat EL 7:
tar zcf MY_CONDA-3.6.10-0-el7.parcel MY_CONDA-3.6.10-0/ --owner=root --group=root - Validate the new generated parcel:
java -jar /path/to/validator.jar -f /usr/local/parcels/MY_CONDA-3.6.10-0-el7.parcel - Sign the parcel:
sha1sum < MY_CONDA-3.6.10-0-el7.parcel | cut -d ' ' -f 1 > MY_CONDA-3.6.10-0-el7.parcel.sha
STEP 5: Install and distribute the Parcel
- Copy the parcel and the sha files to the /opt/cloudera/parcel-repo directory in the Cloudera Manager node.
- Change the permissions:
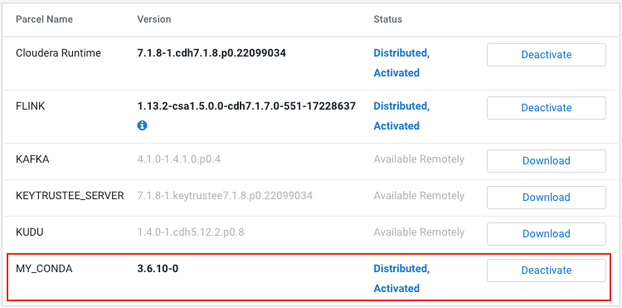
sudo chown cloudera-scm: /opt/cloudera/parcel-repo/MY_CONDA-3.6.10-0-el7.parcel* - Go to Cloudera Manager > Parcels, and click Check for New Parcels
- After the parcels are detected, click Distribute
- Click Activate to activate the Parcel
- Make sure everything is working in all nodes:
/opt/cloudera/parcels/MY_CONDA/miniconda3/bin/python --version
Summary
While this article is not intended to be a definitive guide on this subject, as each company has their own requirements, consider this a simple introduction to how Parcels work in the CDP environment and how to leverage it to get more productivity in Cloudera environments.
Parcel is a binary distribution format that allows us to easily install, update or even remove a set of files in a simple, uniform, versioned, consistent, and distributed way in a Cloudera environment.
We can leverage this to distribute any set of files, such as Java or Python dependencies, different versions of Python, Hive UDFs, HBase coprocessors, scripts, third-party tools, etc. In addition, it is also possible to integrate with existing components, such as adding a library to the classpath of Hive, HBase, Spark, etc.
To learn more about Parcels, including advanced usage and integration with existing Cloudera's components, see the following links:
- Overview of Parcels
- Running Spark Python applications
- Installing Anaconda in Cloudera CDH
- Conda Project
- Cloudera Manager Extensions
- Parcels: What and Why?
- Why you should use Parcels
- The Parcel Format
- Building a Parcel
- The Parcel Repository Format
Created on 12-12-2022 04:56 PM
- Mark as Read
- Mark as New
- Bookmark
- Permalink
- Report Inappropriate Content
What about the manifest file ? how to create it ?
Created on 03-22-2024 10:25 AM
- Mark as Read
- Mark as New
- Bookmark
- Permalink
- Report Inappropriate Content
If you are facing issues with "mvn package" command , please uninstall maven package and install maven 3.6.x.
Also DO NOT change your directory to "cd cm_ext/validator" instead stay on "cd cm_ext " and the execute "mvn package" command


